How To Add DKIM Public Key In DNS Cpanel: Step-By-Step Setup Guide

Quick Answer
Learn how to add a DKIM public key in DNS cPanel with this step-by-step guide. Discover how to create the correct DKIM record, enter the selector and public key, save DNS changes, and verify DKIM authentication for stronger email security and deliverability.
Email authentication is crucial for safeguarding domains against spoofing, phishing, and unauthorized email actions. A prominent method is DomainKeys Identified Mail (DKIM), which employs cryptographic keys to confirm the legitimacy of the sender and ensure that the email content remains unchanged during transmission. To implement DKIM, you must publish a DKIM public key in your domain’s DNS.
For cPanel-managed websites and email domains, adding this key is generally simple. You need to create a DNS TXT record with the public key and link it to the appropriate DKIM selector. After DNS changes are propagated, mail servers can access the key to verify DKIM signatures.
This guide outlines the process for adding a DKIM public key in DNS via cPanel, locating the necessary values, verifying the record, and addressing common configuration issues.
Understanding DKIM and Its Role in Email Deliverability
What DKIM Is and Why It Matters for Email Deliverability
DomainKeys Identified Mail (DKIM) is an essential email authentication method that employs digital signatures to ensure the integrity of incoming messages. Implementing a DKIM record in your DNS significantly improves email deliverability and protects against spoofing. Major email providers like Gmail and Outlook, as well as social platforms like Facebook and LinkedIn, utilize DKIM validation to assess the trustworthiness of a sender’s domain.
When you activate DKIM in cPanel, your outgoing mail server signs each email with a private key, while the related public key is published as a TXT record in your DNS. Recipient servers can use this public key to verify the email’s authenticity. Neglecting to configure DKIM and SPF records can lead to messages being flagged as spam, adversely affecting your domain’s deliverability and increasing susceptibility to spam filters.
How DKIM Works: Public Keys, Private Keys, and DNS TXT Records
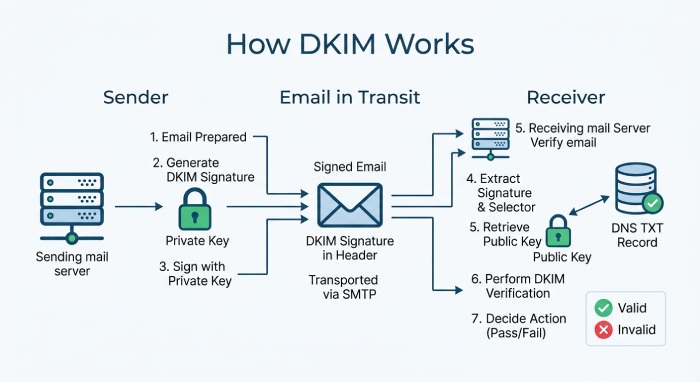
DKIM operates on a cryptographic principle using an asymmetric key pair: a private key (kept secure on the mail server) and a public key (placed in a DNS TXT record). Here’s the step-by-step flow:
- Signing Email: When an email is dispatched, the server uses the DKIM private key to create a digital signature across parts of the message, including the content and key headers.
- Publishing the Public Key: The matching public key is stored within a DKIM TXT record, typically found at a selector-based subdomain (e.g.,
default._domainkey.example.com). - Verification: Upon receipt, the recipient server performs signature verification by retrieving the public key from DNS and checking the integrity of the email using the encrypted signature.
- DNS Role: The accuracy and presence of the DKIM public key in DNS are crucial for proper email authentication and establishing sender identity.
Publishing a correct DKIM record is central to email deliverability, supports robust email policy enforcement (in tandem with SPF records), and improves compliance with the latest guidelines set by Email service providers and regulatory organizations, including Google and Microsoft.
Setting Up DKIM in cPanel: Prerequisites and First Steps
Prerequisites Before Adding a DKIM Public Key in cPanel
Check Domain & DNS Hosting
Before adding a DKIM record in cPanel, determine where your domain’s DNS is managed. If your DNS is managed through cPanel, you can typically add or edit the DKIM TXT record using the Zone Editor. If your DNS is hosted by a third-party provider, you’ll need to publish the DKIM record through that provider’s DNS management interface.
- Domain Management: Your domain must be pointed to the correct nameservers or have correct DNS delegation/zone templates set up.
- Access: Ensure you have admin privileges to manage DNS or edit DNS zones through cPanel or WHM.
- SPF Record: For best practices, enable SPF and ensure a valid TXT record exists for Sender Policy Framework, in addition to DKIM.
Email Services Configuration
- If you use a remote mail service provider (like G Suite or Microsoft 365), consult their documentation for DKIM key setup—these keys often need to be manually added to DNS via cPanel’s Zone Manager.
- Some Email Management interfaces may include a “provision DKIM” or “repair option” if DKIM records are missing, which can expedite setup.
How to Find or Generate Your DKIM Public Key in cPanel
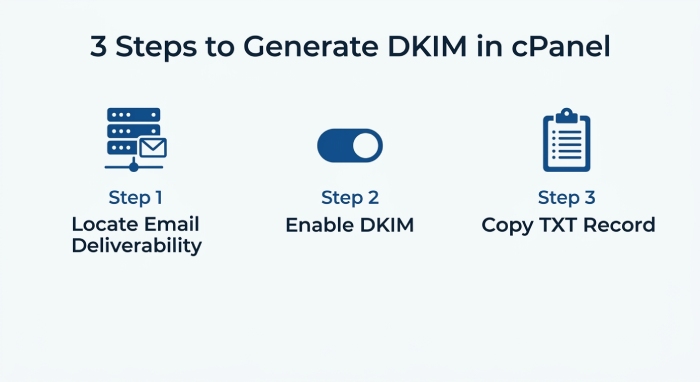
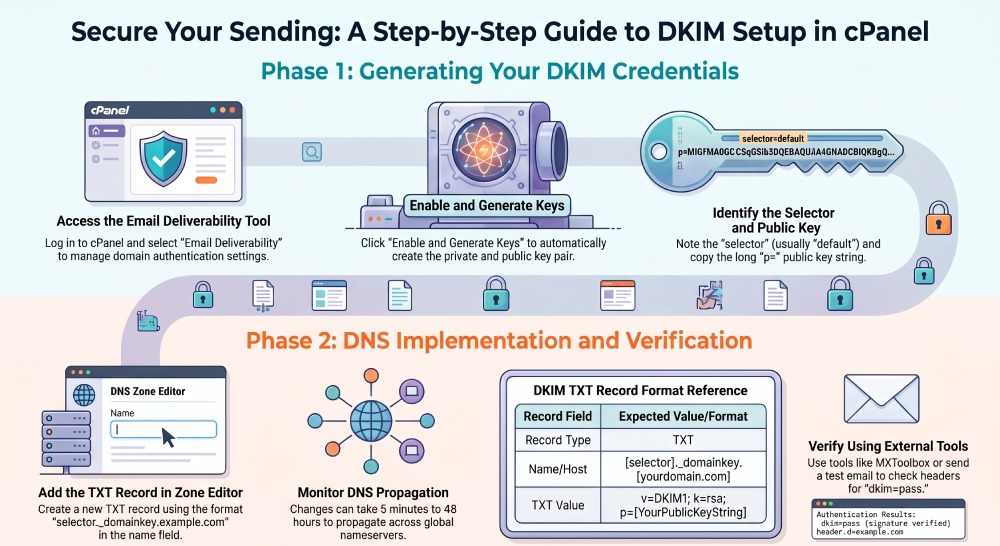
Step 1: Locate DKIM Options in cPanel
On most cPanel installations, DKIM settings can be accessed through the Email Deliverability feature. Depending on your hosting provider and cPanel configuration, the exact menu or option names may vary.
- Email Deliverability Tool: This is the recommended interface for most modern cPanel installations. It lets you view, copy, and repair DKIM records and SPF records for supported domains.
- DNS Zone Editor: Alternatively, advanced users may opt to view all current DNS zones, or “add a new record” manually.
Step 2: Enable or Install DKIM
If DKIM is not already enabled, you will usually see an option to “Enable DKIM” or “Install the Suggested Record.” Clicking this automatically generates a new DKIM key pair for your domain and adds the public key as a TXT record to your DNS zone. If the DNS is managed externally, you will be presented with a raw DKIM record and instructions to add to DNS at your provider’s dashboard.
Step 3: Note the DKIM Selector and Record Details
- Selector: The DKIM selector is a label that helps identify the key; the default is often “default,” resulting in a DNS hostname such as
default._domainkey.example.com. - Public Key Information: The public key will be provided as a long string in the TXT record’s value field.
Step 4: Copy DKIM Record
Use the copy DKIM record function to easily copy and paste DKIM information when you need to manage DNS through another interface, such as when using an external DNS provider.
Step 1: Log in to cPanel and Open the Zone Editor
Accessing Your cPanel Dashboard
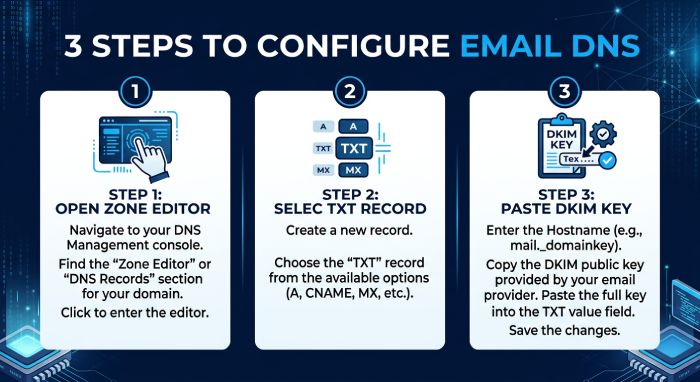
Log in to your cPanel account through your hosting provider or server management portal. Once logged in, open cPanel and navigate to the Email Deliverability or Zone Editor section, depending on your setup.
- cPanel Home: Navigate to the Email section, and locate either “Email Deliverability” or “Zone Editor” depending on your cPanel version and installed features.
- WHM Users: If you’re managing multiple accounts, open WHM (Web Host Manager) and use DNS Functions or the DNS Zone Manager for bulk or reseller edits.
Navigating to the DNS Zone Editor
The Zone Editor is the recommended tool for updating or adding DNS TXT records on your domain:
- Under “Domains,” select your domain and click “Manage.”
- Locate the list of current DNS zones—verify you have “Default._domainkey” as a hostname option.
- Click “Add Record,” then select “TXT” as your DNS record type.
Adding a New DKIM TXT Record
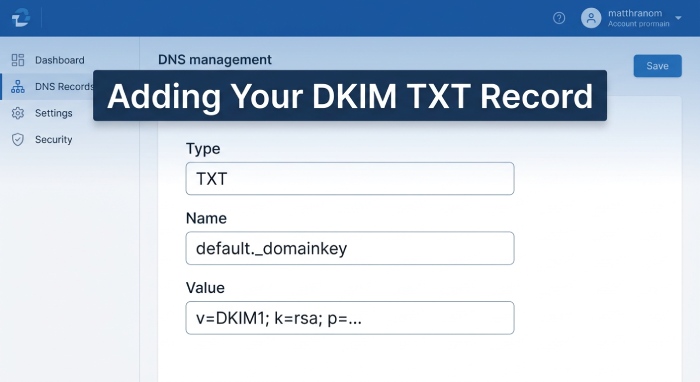
- Name Field: Enter the DKIM selector and domain in the format, e.g.,
default._domainkey*.example.com. This links the DKIM key to your specific email policy and signing mechanism. - Value Field: Paste the DKIM public key you copied earlier (be sure it starts with
v=DKIM1; k=*rsa*; p=...). It’s essential to retain correct formatting to support proper signature verification by recipient servers. - TTL: Optionally set the TTL (Time To Live); recommended defaults are typically 3600 seconds.
- Click “Save” or “Add Record” to update DNS records.
Additional Considerations
- Use mxtoolbox or similar DKIM lookup tools to verify DKIM once it propagates.
- To edit DKIM record entries later, return to the Zone Editor and “edit DNS” as needed.
- For external DNS management, you may need to manually update DNS records at your DNS host’s dashboard.
- If you experience issues, consult cPanel’s documentation or contact your hosting provider’s support team for assistance.
By following these foundational steps, you’ve successfully started the process to add DKIM to your domain’s DNS using cPanel. Up next, you’ll ensure signature verification, repair DKIM if there are discrepancies, and monitor deliverability status using cPanel’s integrated tools or third-party email policy checkers.
Step 2: Select the Correct Domain and Manage DNS Records
Accurately identifying your domain in cPanel is crucial before enabling or adding DKIM for your email services. Start by logging into your cPanel account and accessing either the DNS Zone Manager or Email Management section, depending on your provider. In the DNS Zone Manager, you’ll see a list of your domains, including add-ons and subdomains.
If you manage multiple domains, select the specific one to configure DKIM settings. Use the domains or DNS dashboard to check your DNS zones and verify that the nameserver settings direct to the correct cPanel server. This ensures that any updates you make, including adding DKIM or TXT records, apply to the intended domain, thus improving email authentication and email deliverability.
Additionally, if your DNS is managed externally, ensure that any DKIM changes or DNS updates are synchronized across all systems. Proper domain management and thorough review of DNS host settings are essential for effective email policy enforcement and spam prevention.
Step 3: Add the DKIM Public Key as a TXT Record
Once you’ve selected the desired domain, it’s time to add the DKIM key to your DNS records. The DKIM record consists of a selector, domain, and the all-important public key, which allows recipient servers to verify the digital signature on outgoing mail from your domain.
Locating and Generating the DKIM Record
In most cPanel environments, use the Email Deliverability section to generate DKIM. If it’s your first time, click to enable DKIM or install DKIM—cPanel will generate the DKIM key pair (public and private key) automatically. The public key is displayed as a long string of encoded characters, ready to be added to DNS.
Creating the TXT Record
Head to “Manage DNS,” “Edit DNS,” or directly to DNS Zone Manager. Next, proceed to “Add a New Record.” Choose the DNS record type as TXT.
Name and Value Fields
- Name Field: Enter the selector and domain in this format:
default._domainkey*.example.com. This aligns with thedefault._domainkeynaming convention published by DomainKeys Identified Mail standards. - Value Field: Paste the public key you copied from the cPanel generated record. This raw DKIM record (starting with
v=DKIM1; k=rsa; p=...) is the core of your DKIM authentication.
If your environment includes managing subdomains or external DNS hosts, ensure you’re adding the TXT record to the correct DNS zone. For advanced configurations with zone templates, or for bulk provisioning, review and edit zone templates as provided in Email DNS Record Manager.
Saving and Applying the Record
After copying the DKIM record and entering it in both the name and value fields, double-check for any extraneous spaces or corrupted characters that could break the public key. Save the record, and your DNS provider (be it the cPanel server or an external DNS provider) will begin the propagation process.
Step 4: Save the Record and Wait for DNS Propagation
Saving your DKIM TXT record in DNS is not the final step—full global availability can take time, depending upon your TTL (Time To Live) settings and the speed of propagation across nameservers. Most cPanel DNS hosts allow you to set the TTL, with shorter values (like 300 seconds) offering faster propagation at the cost of more frequent lookups.
DNS Propagation Considerations
Please note that the new DKIM record may take between a few minutes and up to 48 hours to propagate, especially if you’re using external DNS providers or remote mail services like Google Workspace or Office 365. You can track this using tools like MXToolbox, which will indicate if the DKIM public key is accessible.
During this time, keep an eye on your domain management dashboard and email deliverability reports, as updates may not be immediate. Signature verification depends on the recipient server’s ability to retrieve the public key from DNS.
How to Verify Your DKIM Record Is Working Correctly
Verifying your DKIM record is essential for ensuring that your efforts to add DKIM, install DKIM, or repair DKIM have succeeded and that email authentication for your domain is functioning as intended.
Using Online Tools and Email Services
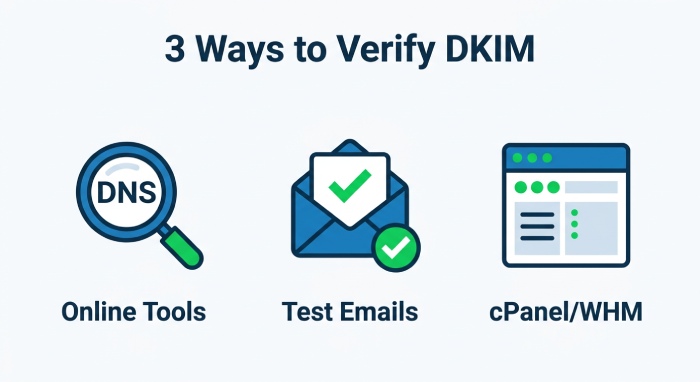
Several methods can verify DKIM is correctly installed:
- MXToolbox: Enter your selector and domain (e.g.,
default._domainkey.example.com) to query the public key from DNS. - Send Test Emails: Send an email from your domain to external email services such as Gmail or Outlook. Then, in the email header, check for a line like
DKIM-Signature:—this indicates your mail server is signing email and that recipient servers are able to find your public key. - Check Feedback in WHM or cPanel: Within WHM or the cPanel Email Deliverability section, you may see alerts or green indicators if both DKIM and SPF record configurations pass the necessary checks for signature verification.
Troubleshooting DKIM Verification
If verification fails, possible causes include DNS propagation delays, errors in the value field or name field, missing or incorrect selectors, or failure to update DNS records on the right DNS host. For cPanel users, a repair option within Email Deliverability can often resolve obvious DKIM record issues by re-generating or suggesting the correct record, helping maintain reliable email security and authentication.
Troubleshooting Common DKIM DNS Issues in cPanel
While cPanel and WHM can simplify DKIM management, several configuration issues can still prevent successful email authentication.
Failure Points and Solutions
1. Incorrect TXT Record Syntax
Improper placement of the public key, missing quotation marks, or corrupt DKIM key strings can cause signature verification to fail. Always copy DKIM record text directly from the cPanel generated record, and double-check the raw DKIM record for errors before you add to DNS.
2. Selector and Domain Mismatch
If you’ve generated multiple DKIM records while testing or use a custom selector, ensure the selector in your DNS record matches that of your mail server. Mismatches here can prevent recipient servers from finding your public key.
3. Delayed or Failed DNS Propagation
Using remote email service providers or external DNS can lead to propagation delays. Confirm that your DNS Functions and update DNS records processes have completed across all nameservers. If unsure, try to append IP address lookups or query your DNS zone from multiple locations with MXToolbox.
4. Problems with Zone Templates and Subdomains
When using zone templates for provisioning on a cPanel server, ensure your new DKIM record is correctly inherited by subdomains, and no conflicting TXT records exist within your DNS zone.
5. SPF Record and Email Policy Gaps
For optimal spam prevention and to prevent email spoofing, always enable SPF and maintain consistency between your SPF record and DKIM record. Both must be present and correct to maximize your email deliverability status and authenticate email effectively.
6. Repair and Modify DKIM in cPanel
If you encounter issues after updating your DNS records, use cPanel’s available repair or Suggested Record options to correct the DKIM configuration. If the problem persists, check your hosting provider’s documentation or contact their support team for assistance with editing, installing, or repairing DKIM records.
Adopting a diligent, methodical approach to manage DKIM, provision DKIM entries, and update your DNS records ensures that both public key integrity and email authentication processes remain robust.
General Manager
General Manager at DuoCircle. Product strategy and commercial lead across the email security portfolio.
Secure your email infrastructure
Protect, authenticate, and deliver. Contact our team to find the right solution.