DKIM Network Solutions: DNS, TXT Setup And Troubleshooting

Quick Answer
DKIM Network Solutions helps authenticate outgoing emails by configuring DNS and TXT records correctly. This guide explains DKIM setup, record verification, common configuration errors, and troubleshooting steps to improve email security and deliverability.

Email authentication is essential for safeguarding your domain against spoofing, phishing, and unauthorized email activities. A key technology in this area is DomainKeys Identified Mail (DKIM).
DKIM works alongside SPF and DMARC to strengthen email authentication, help receiving mail servers verify legitimate messages, and support protection against domain spoofing and phishing attempts.
If your domain’s DNS is hosted with Network Solutions, the process of setting up DKIM may initially appear complex. You will likely encounter various components such as DNS records, TXT values, CNAME records, selectors, public keys, and potential propagation delays. However, once you grasp how these elements interact, the DKIM configuration process becomes significantly more straightforward.
This guide will walk you through the configuration of DKIM within Network Solutions, detailing how DKIM operates, the types of DNS records required, the procedure for adding TXT or CNAME records, and tips for resolving common issues.
What Is DKIM?
DKIM is a method for authenticating emails, enabling the receiving mail server to confirm that an email was sanctioned by the domain indicated in its content.
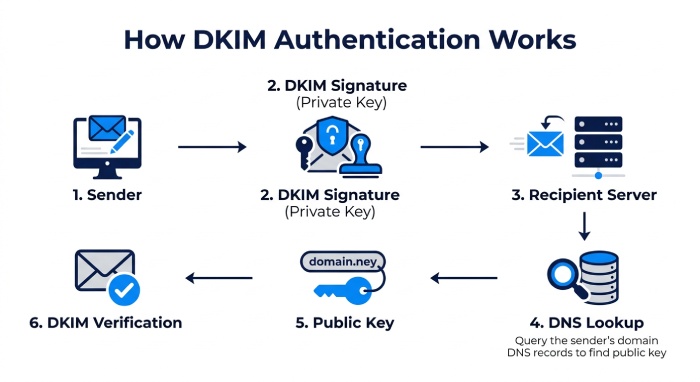
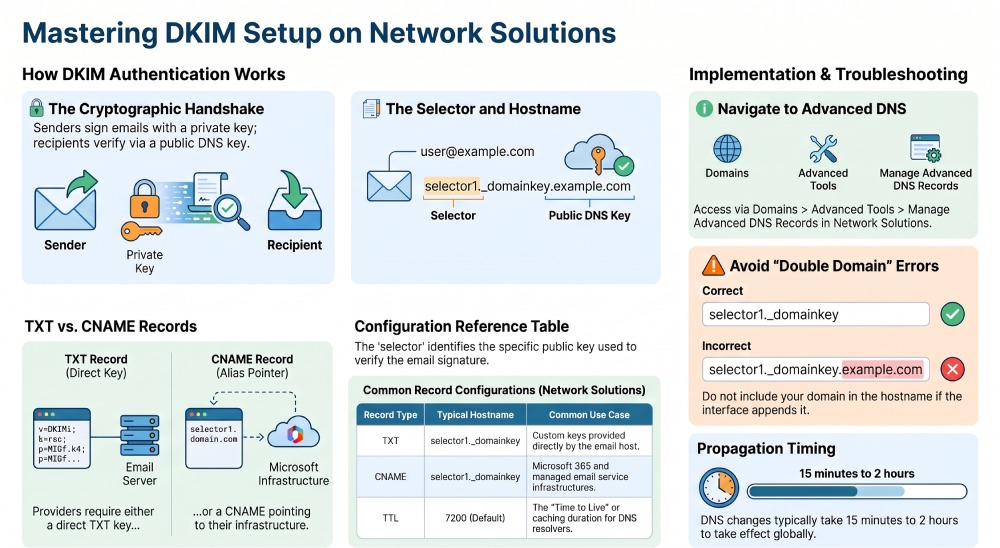
When an email is dispatched, the originating mail server generates a cryptographic signature utilizing a private DKIM key. The associated public key is made available in the domain’s DNS records.
The receiving mail server accesses this public key to verify the authenticity of the signature.
A simplified process looks like this:
Sender → DKIM signature → Recipient server → DNS lookup → Public key → DKIM verification
When the signature is verified, the recipient server can be more assured that the message remains unaltered and was genuinely approved by the sender’s system.
DKIM operates in conjunction with other email authentication measures, including SPF and DMARC. Employing all three enhances the overall effectiveness of email authentication.
How DKIM Works With Network Solutions DNS
Network Solutions serves as your domain registrar and DNS hosting service. However, your email functionalities might be managed by an alternative platform like Microsoft 365, Google Workspace, or another email service provider.
This distinction is important.
Network Solutions manages the DNS records, while your email provider usually generates the DKIM information.
For instance, your email service provider might supply you with a DKIM selector along with a public key. You would then incorporate this information into your DNS settings at Network Solutions.
Network Solutions offers a section for Advanced DNS Records, enabling you to create and oversee TXT and CNAME records efficiently.
DKIM DNS Records: TXT vs. CNAME
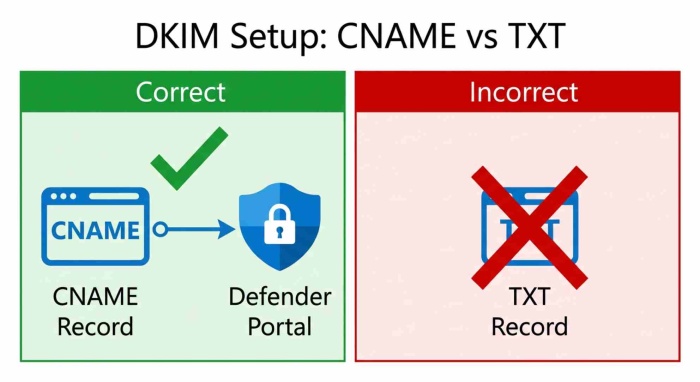
A prevalent source of misunderstanding surrounds the requirement of either a TXT or CNAME record for DKIM. The appropriate choice is contingent upon the specifications of your email service provider.
DKIM TXT Records
Some email services provide a public DKIM key that you publish directly as a TXT record.
A typical DKIM TXT record can look like:
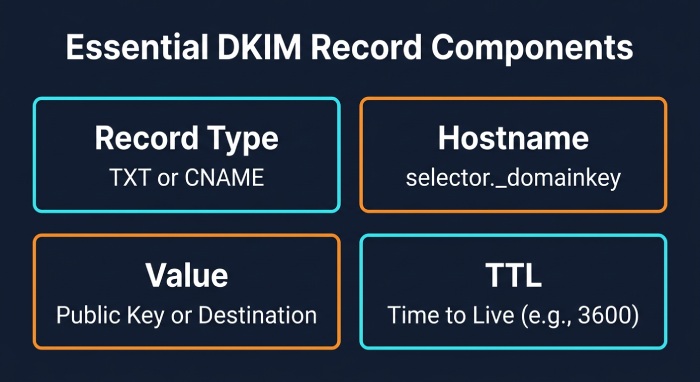
Host: selector1._domainkey
Type: TXT
Value: v=DKIM1; k=rsa; p=PUBLIC_KEY_VALUE
TTL: 3600
The p= value encompasses the public cryptographic key provided by your email service provider.
Avoid replicating this example verbatim. Your service provider is responsible for providing the correct DKIM value specific to your domain.
DKIM CNAME Records
Other platforms, including Microsoft 365, use CNAME records for custom-domain DKIM configuration.
For Microsoft 365, the standard hostnames are:
selector1._domainkey
selector2._domainkey
The values for your destination are tailored specifically for your Microsoft 365 organization. Microsoft advises retrieving the precise CNAME values directly from the Defender portal or through Exchange Online PowerShell, rather than attempting to generate them manually.
As a result, refrain from automatically setting up a TXT record solely due to DKIM configuration. It is essential to adhere to the record type specified by your email service provider.
How to Set Up DKIM on Network Solutions
Before changing DNS, obtain the DKIM records from your email provider.
The provider may give you:
- DKIM selector
- Record type
- Hostname
- TXT public key or CNAME destination
- TTL recommendation
Once you have these values, you can add them to Network Solutions.
1. Sign In to Network Solutions
Log in to your Network Solutions account and open the domain you want to configure. Network Solutions’ current DNS management process takes you through the domain area and Advanced Tools, where you can manage Advanced DNS Records.
2. Open Advanced DNS Records
Navigate to:
Domains → Select Your Domain → Advanced Tools → Manage Advanced DNS Records
Network Solutions provides an option to add a new DNS record from this section.
3. Select the Correct Record Type
Choose + Add Record.
Then select the record type specified by your email provider.
For a DKIM TXT record, choose:
TXT
For a Microsoft 365 DKIM configuration, choose:
CNAME
Using the wrong record type is one of the easiest ways to cause DKIM configuration errors.
4. Enter the DKIM Hostname
The hostname generally contains the selector and _domainkey.
For example:
selector1._domainkeyExercise caution when inputting the hostname, as certain DNS providers will automatically add your domain name. Microsoft notably cautions that entering the full domain in situations where the DNS interface is designed to append it may result in the creation of an inaccurate record, such as:
selector1._domainkey.example.com.example.comUse the hostname format requested by your provider and Network Solutions’ interface.
5. Enter the DKIM Value
For a TXT-based DKIM configuration, paste the complete public-key value into the TXT Value field.
For example:
v=DKIM1; k=rsa; p=YOUR_PUBLIC_KEYIn a configuration that utilizes CNAME, please input the destination provided by your email service provider. Ensure that you do not alter any spaces, punctuation, selectors, or characters related to cryptographic keys. Network Solutions advises customers who are adding TXT records to input the full TXT value given to them.
6. Choose the TTL
TTL stands for Time to Live. It determines how long DNS resolvers can cache a record.
A value such as:
3600
represents one hour.
Network Solutions specifies a default Time to Live (TTL) of 7200 seconds, equivalent to two hours, in the Advanced DNS section of its documentation.
If your email service provider recommends a particular TTL, it is advisable to adhere to their guidance.
7. Save the Record
Before finalizing the addition or saving changes, please ensure that you verify the hostname, record type, value, and TTL. Even a minor typographical error in a DKIM key can disrupt the authentication process.
Microsoft 365 DKIM With Network Solutions
A frequently encountered configuration involves utilizing Network Solutions for DNS management while Microsoft 365 is responsible for email services. In this arrangement, Microsoft 365 supplies the necessary DKIM CNAME values, which are then entered as CNAME records within Network Solutions to strengthen email security and help protect messages from spoofing and unauthorized use.
The records generally use:
selector1._domainkey
selector2._domainkey
Each selector points to a Microsoft-generated destination.
For accurate DKIM setup and forthcoming key rotations, Microsoft mandates the use of two CNAME records. It is essential to note that when configuring DKIM for Microsoft 365 custom domains, the CNAME records must direct to Microsoft’s DKIM infrastructure, rather than opting to manually publish a DKIM public key as a TXT record.
How to Verify a DKIM Record
After saving your DNS record, you should verify that it is publicly visible.
You can use a DNS lookup tool or command-line utilities.
For a CNAME-based setup, you can run:
nslookup -type=CNAME selector1._domainkey.example.comAnd:
nslookup -type=CNAME selector2._domainkey.example.comFor a TXT-based DKIM configuration, use:
nslookup -type=TXT selector1._domainkey.example.comIt is advisable to check the DKIM record or the CNAME destination that is provided by the DNS. Microsoft additionally suggests utilizing either nslookup or dig for verifying DKIM selector records.
Common DKIM Network Solutions Problems
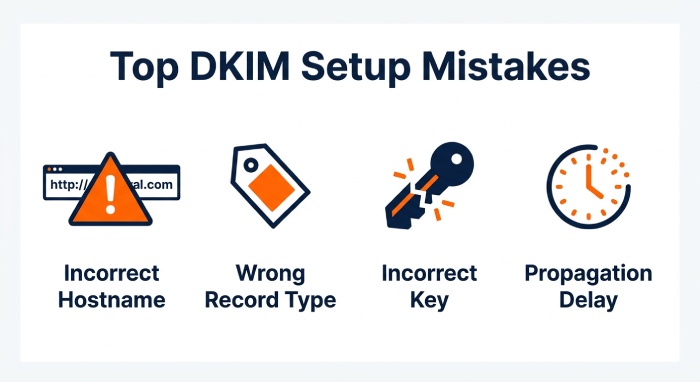
Even when you follow the setup instructions, DKIM may initially fail. Here are the most common issues.
1. Incorrect Hostname
One common mistake is entering the complete domain when Network Solutions automatically appends the domain.
For example, you might accidentally create:
selector1._domainkey.example.com.example.comInstead, the hostname may need to be:
selector1._domainkeyCheck the resulting DNS record carefully.
2. Wrong Record Type
In instances where your service provider mandates the use of CNAME records, the establishment of a TXT record may hinder the activation of DKIM. A prominent example of this is Microsoft 365, which relies on CNAME records for its custom-domain DKIM setup, in contrast to manually published TXT public keys.
3. Missing Selector
The selector indicates to the mail server that is receiving your message which DKIM public key it should access. If your email service provider assigns you selector1, it is essential to publish the appropriate selector record. For Microsoft 365, it is necessary to have both selector1 and selector2 CNAME records in place to ensure correct configuration and enable key rotation.
4. Incorrect DKIM Key
In TXT-based DKIM, a single missing or modified character in the public key can lead to a failed verification. It is essential to directly copy the DKIM value from your email provider. Refrain from manually entering lengthy cryptographic keys to prevent errors.
5. DNS Propagation Delay
Changes to DNS settings may not be instantly reflected across all platforms. According to Network Solutions, the propagation of DNS modifications can require some time. Microsoft suggests that while many DNS alterations generally take approximately 15 minutes to take effect, delays can occasionally occur. If DKIM verification does not succeed right away, it is advisable to wait and conduct another lookup.
6. DKIM Record Published at the Wrong DNS Provider
This matter carries significant importance. While you may have registered your domain with Network Solutions, it is possible that you are utilizing a different provider as your primary DNS host. In such cases, incorporating the DKIM record into Network Solutions may not impact the active DNS zone. According to Network Solutions, if your domain is not employing their nameservers, you must supply DNS records to the true nameserver host. Please verify your domain’s nameservers prior to proceeding with further troubleshooting.
DKIM, SPF, and DMARC Should Work Together
DKIM is only one part of a broader email authentication strategy.
- SPF identifies authorized sending infrastructure.
- DKIM adds a cryptographic signature to outgoing messages.
- DMARC allows domain owners to establish policies based on authentication and alignment results.
For example, a basic DMARC record might look like:
v=DMARC1; p=none; rua=mailto:dmarc@example.comThe DMARC policy you implement should align with the specifics of your email infrastructure and the outcomes of your authentication processes.
It’s also important to note that SPF and DKIM have distinct DNS requirements. Network Solutions explicitly cautions against having multiple independent SPF records for a single domain.
Best Practices for DKIM on Network Solutions
- Use the correct DKIM selector: Ensure that the selector from your email service corresponds with the one listed in your Network Solutions DNS.
- Publish the complete DKIM record: Please input the complete public key as it is given, ensuring there are no alterations or omissions. Network Solutions allows for the addition of DKIM-related DNS records via the Advanced DNS Records feature.
- Verify DNS propagation: Once you have modified or added a DKIM record, it is essential to wait for the DNS changes to take effect before investigating any authentication issues.
- Pair DKIM with SPF and DMARC: DKIM is most effective when integrated into a comprehensive email authentication framework. To enhance domain security and improve email deliverability, it is advisable to set up SPF and DMARC in conjunction with DKIM.
- Test DKIM after setup: Initiate test emails and verify the signature’s validity using a DKIM checker, ensuring that the public key published aligns with the signing key. Additionally, Network Solutions advises conducting a test of the configuration after the record has been published.
General Manager
General Manager at DuoCircle. Product strategy and commercial lead across the email security portfolio.
Secure your email infrastructure
Protect, authenticate, and deliver. Contact our team to find the right solution.