How to Configure SPF, DKIM, and DMARC for Amazon SES

Quick Answer
To configure SPF, DKIM, and DMARC for Amazon SES, verify your domain, enable DKIM signing, set up a custom MAIL FROM domain for SPF alignment, and publish a DMARC record. These steps improve email security, prevent spoofing, and enhance deliverability.
Email authentication is essential for protecting your domain reputation and ensuring that your messages reach recipients’ inboxes. When using Amazon Simple Email Service (SES), properly configuring SPF, DKIM, and DMARC helps verify your emails, reduce spoofing risks, and improve deliverability.
This guide explains how to set up all three authentication methods for Amazon SES.
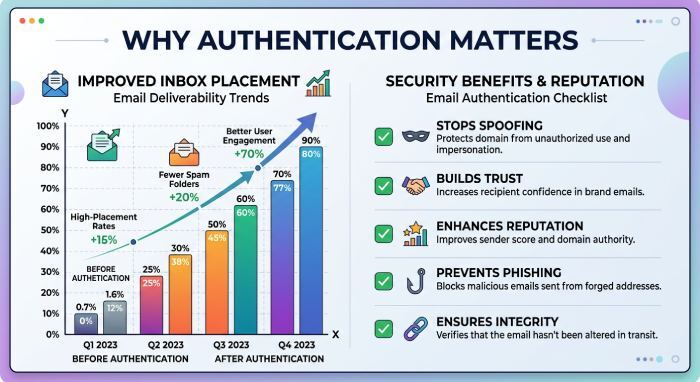
Why Email Authentication Matters
Mail providers evaluate incoming messages using authentication standards to determine whether an email is legitimate. Without proper authentication, emails may be marked as spam or rejected entirely.
By implementing SPF, DKIM, and DMARC, you can:
- Strengthen email security
- Reduce domain impersonation attempts
- Improve inbox placement rates
- Gain visibility into unauthorized email activity
- Build trust with receiving mail servers

Step 1: Verify Your Domain in Amazon SES
Before configuring authentication, your domain must be verified in Amazon SES.
- Sign in to your AWS account.
- Open the Amazon SES console.
- Navigate to Verified Identities.
- Select Create Identity.
- Choose Domain as the identity type.
- Enter your domain name.
- Continue through the setup process.
Amazon SES will generate DNS records that must be added to your domain’s DNS zone for verification.
Once the records are published and DNS propagation is complete, Amazon SES will confirm domain ownership.
Step 2: Configure DKIM for Amazon SES
DomainKeys Identified Mail (DKIM) adds a digital signature to outbound emails. Receiving mail servers use this signature to verify that the message was authorized by your domain and was not modified during transit.
Enable DKIM Signing
- Open Amazon SES.
- Select your verified domain.
- Locate the DKIM settings section.
- Enable DKIM signing.
- Choose the recommended DKIM configuration.
Amazon SES will generate several CNAME records.
Publish DKIM DNS Records
Add the generated CNAME records to your DNS provider.
For each record:
- Select CNAME as the record type.
- Copy the host name supplied by Amazon SES.
- Copy the target value provided by Amazon SES.
- Save the record.
After DNS propagation, Amazon SES will validate the records and activate DKIM signing for your domain.
Step 3: Configure SPF for Amazon SES
Sender Policy Framework (SPF) identifies which mail servers are authorized to send email on behalf of your domain.
Create a Custom MAIL FROM Domain
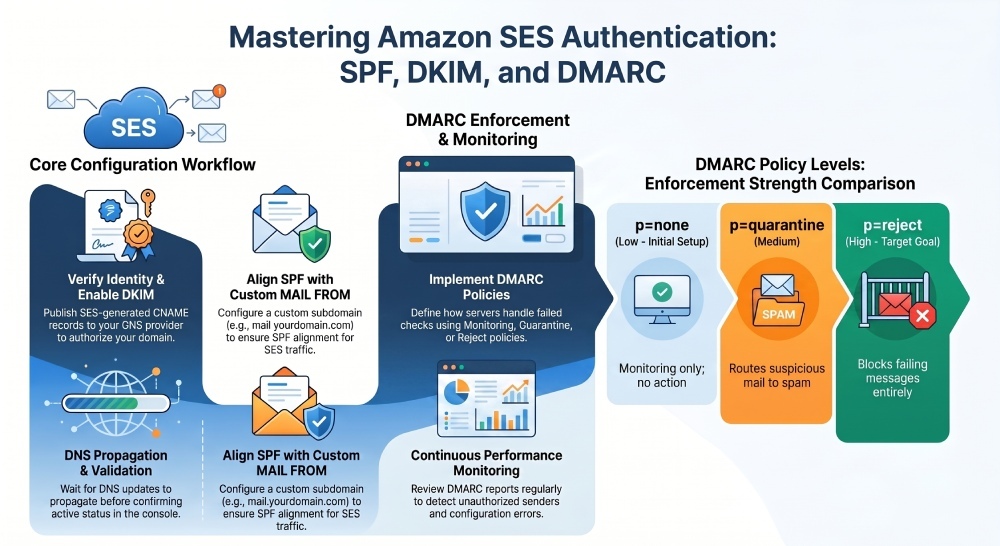
To improve SPF alignment, configure a custom MAIL FROM domain within Amazon SES.
- Open your verified domain settings.
- Find the MAIL FROM Domain section.
- Choose to configure a custom MAIL FROM domain.
- Enter a subdomain such as:
- mail.yourdomain.com
- bounce.yourdomain.com
- ses.yourdomain.com
Amazon SES will generate DNS records required for the configuration.
Add the Required DNS Records
Publish the MX and TXT records provided by Amazon SES.
These records allow Amazon SES to handle bounce processing and authenticate email traffic sent from the designated MAIL FROM domain.
Once validated, SPF alignment will function correctly with Amazon SES email traffic.
Step 4: Publish a DMARC Record
DMARC builds on SPF and DKIM by defining how receiving mail servers should handle messages that fail authentication checks.
Create a DMARC TXT Record
Add a TXT record to:
_dmarc.yourdomain.com
Example DMARC policy:
v=DMARC1; p=none; rua=mailto:dmarc@yourdomain.com
This policy enables reporting while monitoring authentication activity.
DMARC Policy Options
p=none
- Monitoring only
- No enforcement action
p=quarantine
- Suspicious emails may be routed to spam folders
p=reject
- Failing messages are rejected outright
Organizations typically begin with a monitoring policy and move toward stronger enforcement after reviewing reports.
Step 5: Validate Your DNS Records
After publishing SPF, DKIM, and DMARC records:
- Wait for DNS propagation.
- Confirm that Amazon SES shows successful verification.
- Verify DKIM status is active.
- Confirm SPF records are correctly published.
- Check that the DMARC record is publicly visible.

Regular validation helps identify configuration issues before they affect deliverability.
Monitoring Authentication Performance
Setting up authentication is only the first step. Ongoing monitoring is equally important.
Review DMARC reports regularly to:
- Identify unauthorized senders
- Detect configuration errors
- Monitor authentication pass rates
- Improve email security posture
As your email ecosystem grows, continuous monitoring ensures that new sending sources remain compliant with your authentication policies.
Final Thoughts
Amazon SES provides the tools necessary to authenticate outbound email, but proper DNS configuration is required for successful implementation. By verifying your domain, enabling DKIM, configuring SPF alignment, and publishing a DMARC policy, you can significantly improve email security, protect your brand from spoofing attempts, and increase the likelihood that legitimate messages reach their intended recipients.
General Manager
General Manager at DuoCircle. Product strategy and commercial lead across the email security portfolio.
Secure your email infrastructure
Protect, authenticate, and deliver. Contact our team to find the right solution.