Spamexperts Outgoing SPF: How To Configure SPF For Outbound Email

Quick Answer
SpamExperts Outgoing SPF helps authorize outbound email servers and reduce spoofing. Learn how to configure an SPF record for SpamExperts, verify DNS settings, troubleshoot common errors, and improve email deliverability and security for outbound messages.
Configuring SpamExperts Outgoing SPF correctly is essential for authenticating outbound email and maintaining reliable message delivery. SpamExperts outgoing filtering helps scan and route messages before they reach recipients, but receiving mail servers still need to verify that the sending infrastructure is authorized to send email on behalf of your domain. Publishing the appropriate SPF record in your DNS allows SpamExperts’ outbound relay infrastructure to pass SPF authentication and helps reduce spoofing, authentication failures, and potential delivery problems.
This guide explains how SpamExperts Outgoing SPF works and walks through the process of identifying the correct SPF include, adding or updating the record, and testing the configuration after DNS changes. It also covers common SPF mistakes, including duplicate SPF records, incorrect include mechanisms, and missing authorized senders, along with practical steps for troubleshooting and maintaining an accurate SPF policy over time.
What SpamExperts Outgoing Filtering Is and Why SPF Matters
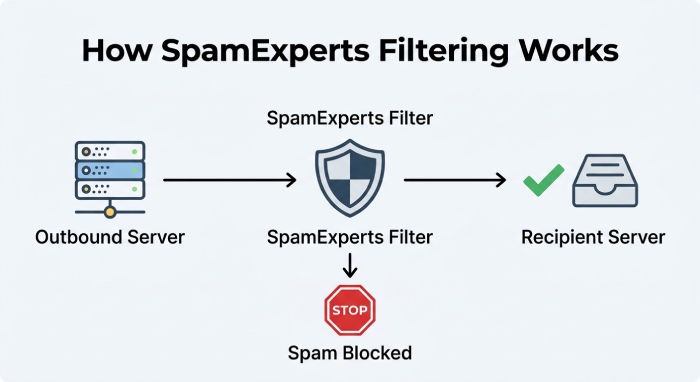
SpamExperts outgoing filtering is an outbound email security service used to scan, route, and control outbound messages before they reach the recipient’s mail server. Often provided through N-able, SpamExperts Email Services, WHMCS MarketConnect, or a hosting provider, the outgoing filter helps prevent compromised accounts, scripts, or mailboxes from sending spam through your infrastructure.
For SPF to work correctly with Spam Experts, your domain’s DNS must authorize the SpamExperts outbound relay infrastructure. This is done by publishing an SPF record as a TXT record. In most standard deployments, the required SPF mechanism is:
include:spf.antispamcloud.comA typical Spam Experts SPF record may look like this:
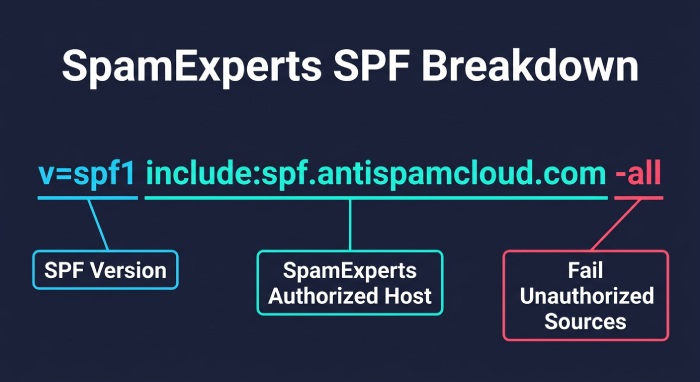
v=spf1 include:spf.antispamcloud.com -allThis tells receiving systems that servers listed under spf.antispamcloud.com and the wider antispamcloud.com infrastructure are authorized sending hosts for your domain. Without the correct SPF record, legitimate mail routed through Spam Experts outgoing filtering may fail authentication, increasing the chance of rejection, spam-folder placement, or disrupted mail delivery.
Why outbound SPF is different from inbound filtering
Inbound filtering protects your domain from malicious or unwanted mail. Outgoing filtering protects recipients and your reputation by ensuring outbound messages are scanned before delivery. SPF supports this process by allowing receiving systems to verify that the sending IP address is permitted to send for the envelope from address.
For example, if your domain routes SMTP submission through a SpamExperts Outbound Relay such as smtp.antispamcloud.com , recipients may see an antispamcloud.com-hosted mail server handling delivery. Your DNS records therefore need to declare that infrastructure as valid.
SPF helps prevent email spoofing
Sender Policy Framework, defined in RFC 7208, is designed to reduce email spoofing by letting a domain owner restrict mail servers that can send mail on behalf of a domain. When you configure DNS properly, your SPF record becomes a public policy that receiving mail exchangers can check against the primary sending IP, secondary sending IP, or any other authorized mail source.
SPF is not a replacement for DKIM
SPF validates the sending path, while DKIM validates message integrity and domain signing. For best results, use Sender Policy Framework together with DKIM and, where possible, DMARC. Spam Experts outgoing filtering can be part of a broader authentication strategy, but the TXT record in DNS remains essential.
How SPF Works for Outbound Email Authentication
Sender Policy Framework works by comparing the sending IP address against the domain’s published SPF record. When a recipient’s mail server receives a message, it checks the envelope from address, extracts the domain, and performs a DNS lookup for that domain’s TXT record.
If the message was sent through Spam Experts and your DNS contains include:spf.antispamcloud.com, the receiver expands that include and checks whether the sending infrastructure is listed. If the lookup matches, SPF passes. If not, SPF may fail, especially when the record ends in -all.
A basic SPF record for Spam Experts often uses:
v=spf1 include:spf.antispamcloud.com -allThe v=spf1 tag identifies the record as a Sender Policy Framework policy. The include:spf.antispamcloud.com mechanism authorizes the sending sources permitted by SpamExperts SPF policy. The -all mechanism produces an SPF fail for sources that are not authorized by the record.
Understanding the SPF mechanisms
A record may include several mechanisms, such as ip4, ip6, a, mx, and include. For example, an A record mechanism authorizes the IP address behind a hostname, while an MX mechanism authorizes the mail exchanger for the domain.
However, many administrators prefer includes because providers such as Spam Experts maintain the public IP addresses behind spf.*antispamcloud.com*. This avoids manually tracking every SMTP hostname or changing IP address used by the platform.
The role of SRS in forwarding
Forwarded mail can complicate SPF because the original envelope from address may remain unchanged while the forwarding mail server changes. Spam Experts environments may use an SRS component, or Sender Rewriting Scheme, to preserve authentication during forwarding. Sender Rewriting Scheme (SRS) rewrites the sender address so SPF can still pass after mail is relayed through another system.
Helpful SPF tools and references
Administrators can use an SPF wizard such as spfwizard.net to build a new SPF record or validate syntax. The Open SPF project at open-spf.org is also a useful reference for Sender Policy Framework behavior, although RFC 7208 remains the authoritative specification.
Preparing Your Domain and Identifying the Correct SpamExperts SPF Record
Before editing DNS, identify every legitimate outbound source for the domain. This may include your hosting mail server, Microsoft 365, Google Workspace, an application server, marketing tools, and Spam Experts outgoing filtering.
You should also determine whether the domain is a root domain, a subdomain, or a client domain managed through a reseller panel. In Web Host Manager Complete Solution(WHMCS), SpamExperts Email Services may be provisioned through MarketConnect, and account notifications may appear under Email & Notifications. If the service details are unclear, check N-ableMe documentation or open a support ticket with your provider.
Choosing the right antispamcloud.com include
For most cloud users and local cloud users, the global include is appropriate:
include:spf.antispamcloud.comA complete TXT record may be:
v=spf1 include:spf.antispamcloud.com -allSpam Experts may also support regional SPF records where routing is region-specific. These can include:
- EU-only:
spf-eu.antispamcloud.com - US-only:
spf-us.antispamcloud.com - UK-only:
spf-uk.antispamcloud.com - AU-only:
spf-au.antispamcloud.com - CA-only:
spf-ca.antispamcloud.com - ZA-only:
spf-za.antispamcloud.com
For example, an EU-only configuration may use:
v=spf1 include:spf-eu.antispamcloud.com -allIn most cases, however, include:spf.antispamcloud.com is safer unless your provider explicitly instructs you to use a regional SPF record.
Branded SPF records for providers
Some resellers use a branded SPF record for clients’ SPF records. For example, a provider may publish a branded include that ultimately references spf.antispamcloud.com or other antispamcloud.com mechanisms. If you manage a client domain, confirm whether the DNS provider instructions require the standard Spam Experts include or a provider-specific hostname such as release.antispamcloud.com for related release actions.
Step-by-Step Guide to Adding or Updating Your SPF DNS Record
Step 1: Find the current SPF TXT record
Log in to your domain provider or DNS provider and locate the DNS zone for the domain. Look for an existing SPF record published as a TXT record. It will usually start with v=spf1.
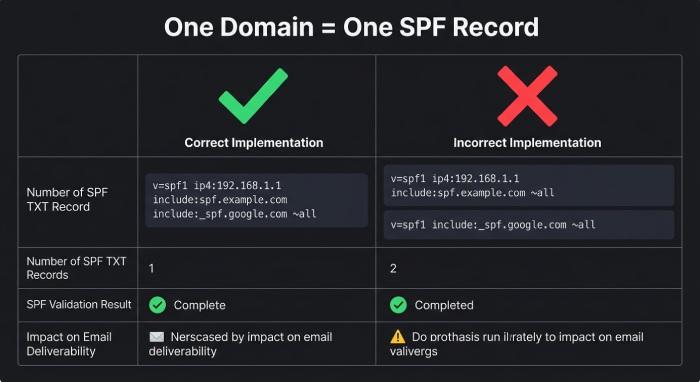
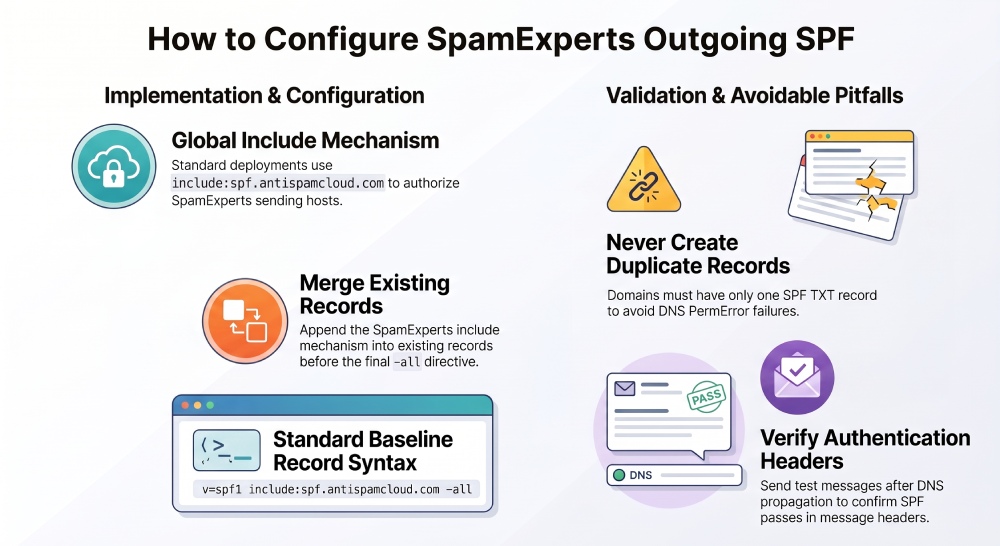
Important: a domain should have only one SPF record. Multiple SPF TXT records can cause SPF permerror results. If an existing SPF record is present, do not create a duplicate. Instead, modify SPF record content and add to SPF record mechanisms as needed.
Step 2: Add SpamExperts to the SPF policy
If no SPF exists, create a new SPF record as a TXT record at the root of the domain:
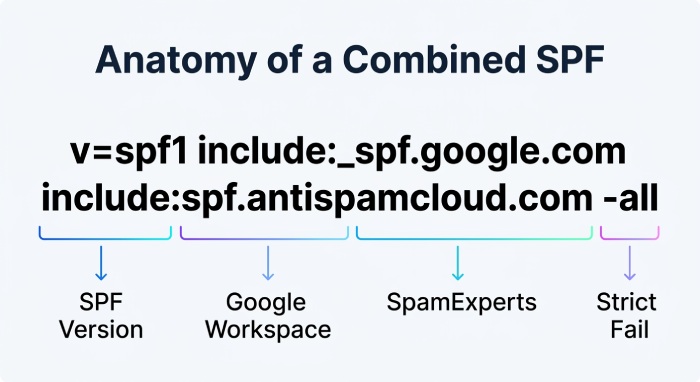
v=spf1 include:spf.antispamcloud.com -allIf an existing SPF record already authorizes other services, add include:spf.antispamcloud.com before the final all mechanism. For example:
v=spf1 include:_spf.google.com include:spf.antispamcloud.com -allIf your current policy uses ~all, you may keep it during testing, but -all is stricter and tells receivers to reject unauthorized senders. Use -all only when you are confident all authorized sending hosts are included.
Example with local and cloud senders
If your own mail server sends directly using an A record or static IP address, combine it with Spam Experts:
v=spf1 a mx ip4:203.0.113.10 include:spf.antispamcloud.com -allThis allows your domain’s A record, mail exchanger, a specific IP address, and Spam Experts outgoing filtering through antispamcloud.com. Keep the record concise because Sender Policy Framework has DNS lookup limits.
Step 3: Save and allow DNS propagation
After you configure DNS, save the TXT record and allow time for DNS to propagate changes. The TTL value controls how long DNS server caches may retain the old data. A low Time-To-Live(TTL) can speed up changes during migration, but propagation still depends on resolver caching.
If your outbound SMTP hostname is 6205.submission.antispamcloud.com, continue using that for SMTP submission as instructed by your provider; the SPF record only authorizes the outbound path and does not replace SMTP credentials or relay configuration.
Testing, Troubleshooting, and Maintaining Your SpamExperts Outgoing SPF Setup
Verify SPF after publishing
Once DNS has propagated, query the TXT record using a DNS lookup tool and confirm the domain returns a single SPF record containing v=spf1 and include:spf.antispamcloud.com. You can also use spfwizard.net, command-line tools such as dig TXT example.com, or platform diagnostics from your hosting provider.
Send a test message through the Spam Experts outgoing filter and inspect the authentication headers. A successful result should show SPF passing for the envelope from address when the sending IP address belongs to authorized antispamcloud.com infrastructure.
Common configuration mistakes
The most common issue is publishing more than one SPF record. Another frequent problem is replacing the existing SPF record instead of merging mechanisms, which accidentally removes another mail server or application sender. Also check for typos such as missing include:, incorrect hostnames, or placing -all before all mechanisms are listed.
If SPF fails, confirm whether your account uses the global spf.antispamcloud.com record or one of the regional SPF records such as spf-us.antispamcloud.com, spf-uk.antispamcloud.com, or spf-au.antispamcloud.com. For N-able or Spam Experts environments, your provider can confirm the correct Outbound Relay configuration.
Maintain the SPF record over time
Review DNS records whenever you add a new application, migrate a mail server, change SMTP routing, or onboard a client domain. The SPF record should reflect all current authorized sending hosts while avoiding obsolete services. Maintaining accurate Sender Policy Framework data helps Spam Experts outgoing filtering protect reputation and preserve reliable mail delivery.
General Manager
General Manager at DuoCircle. Product strategy and commercial lead across the email security portfolio.
Secure your email infrastructure
Protect, authenticate, and deliver. Contact our team to find the right solution.