DKIM Wizard And DNS Propagation: How To Verify DKIM Records Successfully

Quick Answer
To verify DKIM records after using a DKIM wizard, publish the generated TXT record at selector._domainkey.yourdomain, then confirm DNS propagation by querying the authoritative nameserver with dig and comparing the answer with recursive resolvers such as 8.8.8.8 and 1.1.1.1. Validate the selector and public key match the wizard output, then send a test email and check for dkim=pass in Authentication-Results.
Email authentication helps protect businesses from domain spoofing, phishing, and unauthorized email activity. DomainKeys Identified Mail (DKIM) lets receiving mail servers verify an email’s cryptographic signature and check whether the signed content has been changed.
Generating a DKIM key is just one step. The public key must be published correctly in DNS, be available to external resolvers, and correspond to the private key used by the sending platform.
A DKIM Wizard can simplify key generation and DNS setup. Propagation checks help administrators confirm that the required records are accessible. Understanding both steps makes it easier to find configuration issues and maintain reliable email authentication.
What Is DKIM and How Does It Work?
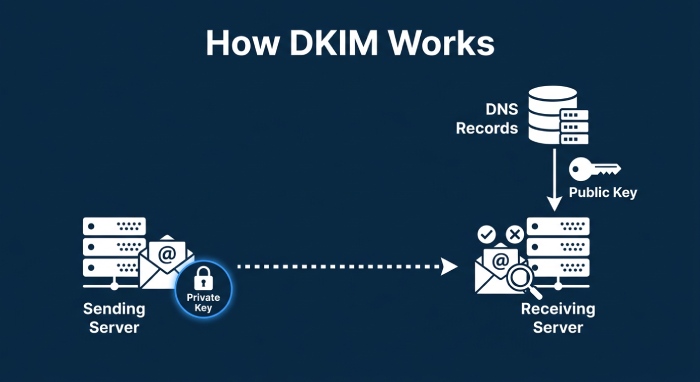
DomainKeys Identified Mail (DKIM) is an email authentication protocol that uses public-key cryptography to verify the digital signatures attached to outgoing messages.
It relies on two keys:
- Private Key: Stored securely by the sending platform and used to sign outgoing emails.
- Public Key: Published in the domain’s DNS records and retrieved by receiving servers to verify signatures.
When an email is sent, the sending server adds a DKIM-Signature header with details such as the signing domain (d=), selector (s=), and digital signature (b=). The receiving server uses the domain and selector to find the public key in DNS.
For example, if an email uses the selector selector1 and signing domain example.com, the receiving server queries:
selector1._domainkey.example.comDKIM authentication can pass when the public key is available and the signature is valid. Incorrect DNS records, mismatched keys, or changes to signed content can cause verification to fail.
What Is a DKIM Wizard?
A DKIM Wizard is a guided configuration tool that helps administrators generate DKIM keys and prepare the DNS records required for email authentication.
Depending on the platform, it may provide several functions:
- Key Generation: Creates a public-private key pair for signing and verifying emails.
- Selector Configuration: Helps identify the DNS location where the public key will be published.
- DNS Record Generation: Provides the required hostname and public key value, usually for a TXT record.
- Setup Instructions: Guides administrators through publishing records with their DNS hosting provider.
- Record Validation: Some tools check whether the published record is accessible and follows the expected format.
A DKIM Wizard can reduce manual setup, but its features vary by provider. Some tools validate DNS records; others also perform more advanced authentication checks. Even when DNS records validate successfully, outgoing email may still fail DKIM authentication.
Understanding DNS Propagation and Why It Matters for DKIM
DNS propagation is the process of DNS updates becoming available to resolvers across networks. After an administrator publishes a DKIM record, the authoritative DNS zone must be updated. Recursive resolvers fetch the new information from authoritative nameservers, but may continue serving cached responses until they expire. As a result, the new DKIM record may appear on the authoritative nameserver while some external resolvers still return an older response. During this period, DKIM verification may be affected because receiving mail servers need to retrieve the correct public key.
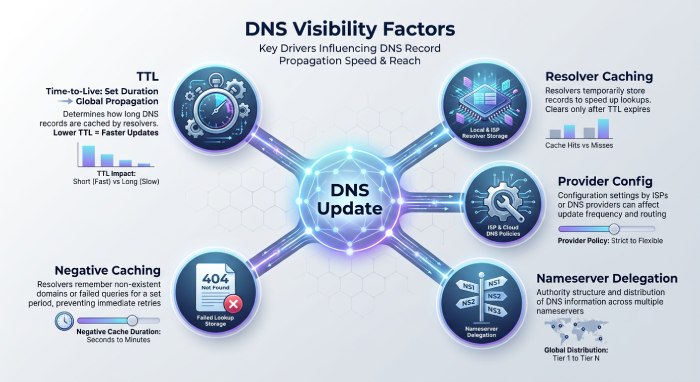
Several factors influence DNS visibility:
- Time to Live (TTL): Determines how long DNS information may remain cached.
- Resolver Caching: Different recursive resolvers may retain older responses.
- DNS Provider Configuration: Incorrect entries or unsuccessful updates can prevent the expected record from appearing.
- Nameserver Delegation: Incorrect delegation may direct queries to an outdated DNS zone.
- Negative Caching: Previously cached responses indicating that a record does not exist may delay its visibility.
DNS updates do not become available everywhere at one exact moment. Checking authoritative and recursive DNS responses provides a clearer picture of the update.
How to Verify DKIM Records Using a DKIM Wizard
After generating and publishing a DKIM record, follow these steps to check its configuration and confirm that outgoing emails authenticate correctly.
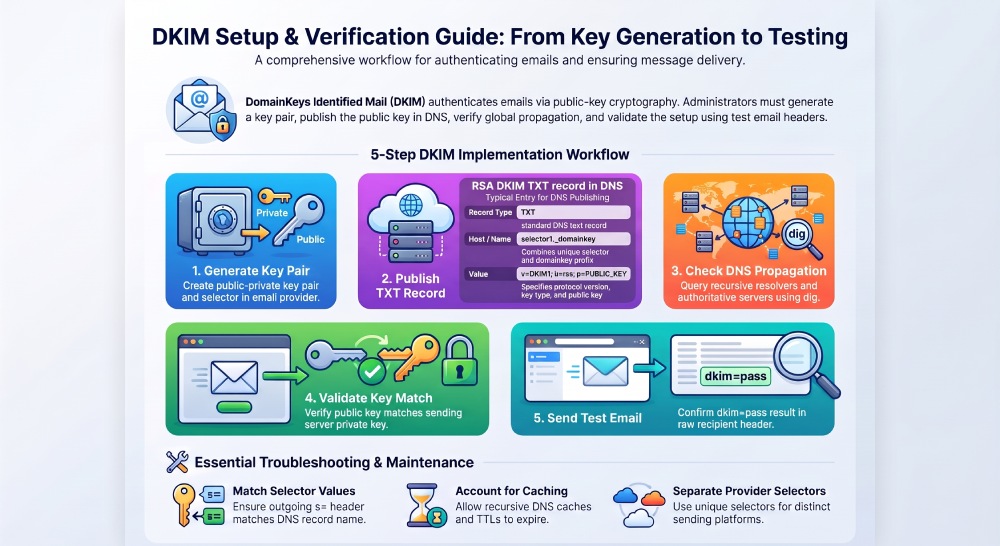
Step 1: Generate the DKIM Key and Selector
In your email service’s DKIM settings or management platform, select the domain you want to authenticate and generate a DKIM key pair. The platform typically provides a selector, public key, DNS hostname, and instructions for publishing the key.
For example:
selector1._domainkey.example.comThe selector identifies the public key that receiving mail servers must retrieve. Keep the private key securely configured within the sending platform. Never publish it in DNS.
Step 2: Publish the DKIM Record in DNS
Log in to your DNS hosting provider and add the record using the exact details supplied by your email service.
A typical RSA-based DKIM TXT record may look like this:
| DNS field | Example |
|---|---|
| Type | TXT |
| Host | selector1._domainkey |
| Value | v=DKIM1; k=rsa; p=PUBLIC_KEY_VALUE |
| TTL | Provider-recommended value |
The example uses RSA; other key types or configurations may vary. Verify the hostname and selector, and enter the complete public key. If your DNS provider appends the domain automatically, don’t enter it twice. Save the record and confirm the provider accepted the update.
Step 3: Check DNS Propagation
Use DNS lookup tools to determine whether the DKIM record is accessible.
Useful options include:
- Google Admin Toolbox Dig
- DNSChecker
- MXToolbox
- Command-line dig
For example, run:
dig TXT selector1._domainkey.example.comTo query an authoritative nameserver directly, first identify the domain’s nameservers:
dig NS example.comThen query the relevant server:
dig @ns1.example-dns.com TXT selector1._domainkey.example.comReplace the example nameserver with your actual authoritative nameserver.
You can also compare recursive resolver responses:
dig @8.8.8.8 TXT selector1._domainkey.example.com
dig @1.1.1.1 TXT selector1._domainkey.example.com
If the authoritative server returns the correct record but some recursive resolvers return older information, caching may explain the difference.
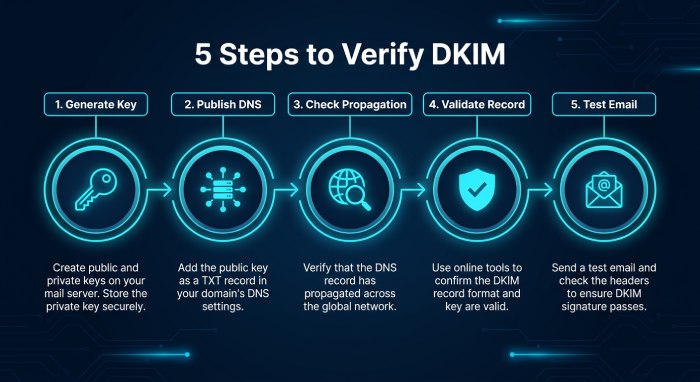
Step 4: Validate the DKIM Record
A successful DNS lookup confirms that the record can be retrieved, but it doesn’t verify that the public key matches the sending platform’s private key.
Use a DKIM validation tool or your DKIM Wizard to inspect:
- Whether the selector matches the outgoing email header.
- Whether the complete public key is published.
- Whether the DNS record follows the expected DKIM format.
- Whether the public key corresponds to the configured private key.
- Whether the record is accessible through DNS.
If validation reports an error, compare the DNS response with the original configuration supplied by your email provider.
Step 5: Send a Test Email
Send a message from your authenticated domain to an external mailbox that provides access to original email headers.
In Gmail, open the message, select the options menu, and choose Show original.
Look for the Authentication-Results field.
A successful result may look like:
dkim=pass header.d=example.comThis confirms that the receiving server successfully verified the DKIM signature for the specified signing domain, helping strengthen email security and protect message authenticity. If the result is dkim=fail, check the selector, public key, signing configuration, and whether the message was modified. Test an actual email, since DNS availability alone doesn’t confirm successful DKIM authentication.
Common DKIM Propagation Problems and Their Solutions
Even correctly planned DKIM configurations can encounter DNS and authentication problems.
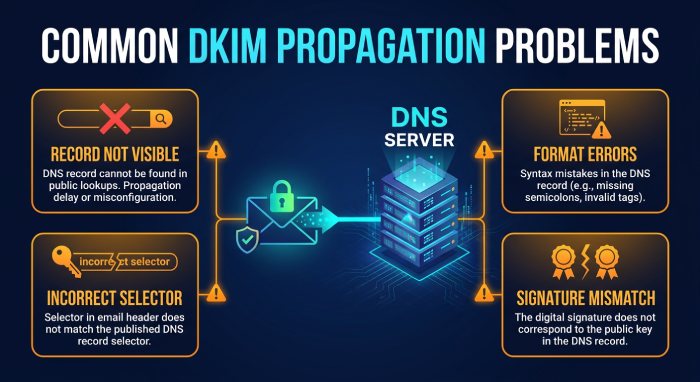
1. DKIM Record Is Not Visible: The record may be missing because the DNS update hasn’t been published, the hostname is incorrect, or a resolver has cached an older response.
Solution: Review the DNS dashboard, query the authoritative nameserver, and compare its responses with those from recursive resolvers.
2. Incorrect DKIM Selector: The selector in the outgoing email’s DKIM-Signature header must match the DNS hostname.
Solution: Compare the s= value in the email header with the published selector and correct any mismatch.
3. Incorrect TXT Record Formatting: Missing characters or unintended changes to the public key can prevent verification. Long TXT values may appear as multiple quoted strings; this is not necessarily an error.
Solution: Compare the full DNS response with the original public key to confirm that no characters are missing.
4. Multiple or Conflicting DKIM Records: Different email service providers can use separate selectors, but conflicting records for the same selector can cause lookup problems.
Solution: Review existing selectors and confirm which sending platforms depend on each record before making changes.
 5. DNS Cache Delays:
Some recursive resolvers may continue serving cached responses after DNS records are updated on the authoritative server.
Solution: Compare authoritative and recursive responses, review Time to live (TTL) settings, and allow relevant caches to expire.
6. DKIM Signature Does Not Match the Public Key: The sending server may be using a private key that does not correspond to the published public key.
Solution: Check the sending platform’s key configuration, confirm the correct public key is published, and send another test message.
Best Practices for Maintaining DKIM Records
Regular DKIM maintenance helps prevent authentication problems when businesses change email providers, update DNS settings, or manage multiple sending services.
- Monitor DNS Changes: Check DKIM records after nameserver changes, DNS migrations, and authentication updates.
- Use Separate Selectors: Where supported, configure distinct selectors for different sending services.
- Rotate Keys Carefully: Follow your provider’s recommendations, and confirm the new public keys are available before removing the old ones.
- Maintain a DNS Inventory: Document active selectors, their associated services, and key ownership.
- Test After Migrations: After switching email providers, verify your DKIM configuration and send test emails.
- Monitor SPF and DMARC: Check all three authentication mechanisms to identify issues beyond DKIM.
SPF checks whether a sending IP address is authorized, DKIM verifies message signatures, and DMARC checks whether SPF or DKIM passes and aligns with the visible From domain. Together, these protocols provide a stronger email authentication framework.
A DKIM Wizard can simplify key generation, selector configuration, and DNS record creation. But setting up a record is only part of the process. Administrators should confirm that the correct public key is published, check that DNS records are accessible across resolvers, validate the selector, and test actual outgoing messages.
Use DKIM configuration tools alongside DNS lookups and email header analysis to identify issues before they affect authentication. Regular monitoring and properly configured SPF and DMARC can further strengthen domain protection and support reliable business email delivery.
Topics
General Manager
General Manager at DuoCircle. Product strategy and commercial lead across the email security portfolio.
Secure your email infrastructure
Protect, authenticate, and deliver. Contact our team to find the right solution.