Adding A DKIM Record In DNS For Better Email Security

Quick Answer
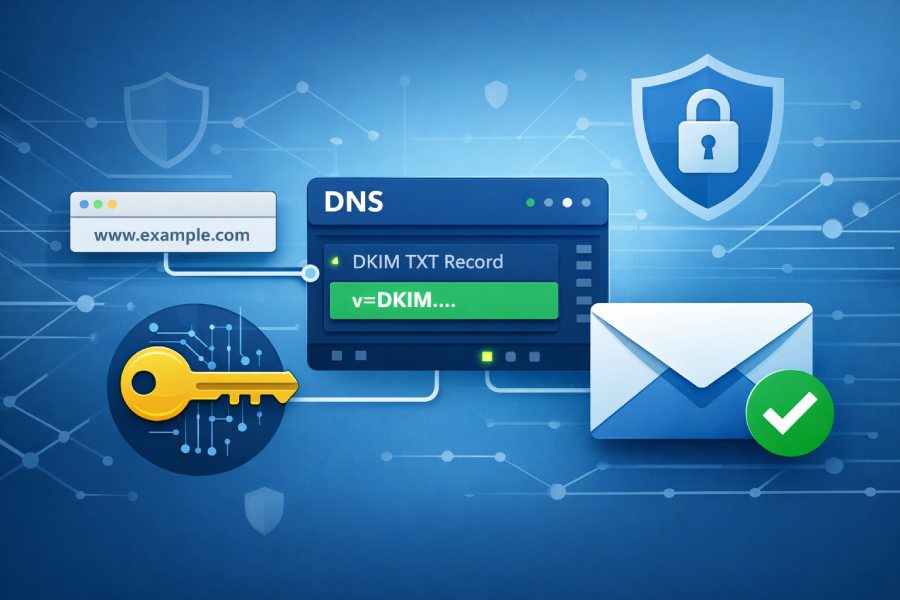
To add a DKIM record, generate a key pair on your sending service, publish the public key as a TXT record (or CNAME for Microsoft 365) at selector._domainkey.yourdomain.com, and keep the private key on the mail server. Receivers fetch the key via DNS and verify the DKIM-Signature against the message header and body.
Email security threats continue to evolve, making strong authentication more important than ever. One of the most effective ways to protect your domain from spoofing and phishing attacks is by implementing DomainKeys Identified Mail (DKIM). By adding a DKIM record in your DNS, you create a digital signature that verifies your outgoing emails are genuinely sent from your domain and have not been altered in transit.
Adding a DKIM record not only improves email authentication but also strengthens your overall deliverability and brand trust. When properly configured alongside SPF and DMARC, DKIM helps mailbox providers identify legitimate messages, reducing the chances of your emails landing in spam folders while blocking malicious actors from impersonating your domain.
Why DKIM matters: deliverability, spoofing protection, and its role with SPF and DMARC
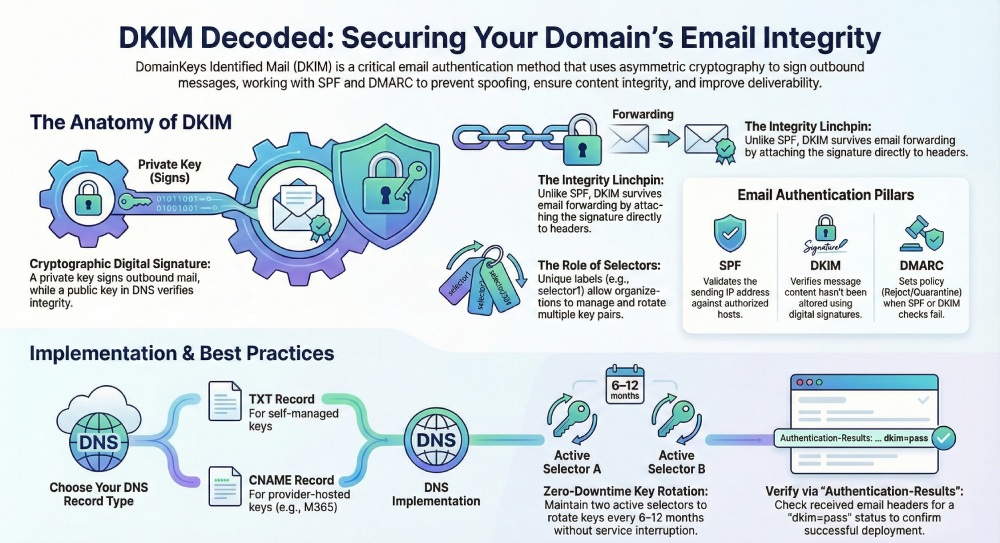
DomainKeys Identified Mail (dkim) is a core email authentication control that improves deliverability and protects recipients from spoofed senders. By attaching a dkim signature to each message header, your signing domain asserts that the email originated from an authorized mail server and that its contents weren’t altered in transit. Receiving systems then use DNS to verify message signature details, bolstering message integrity and helping authenticate email from your custom domain.
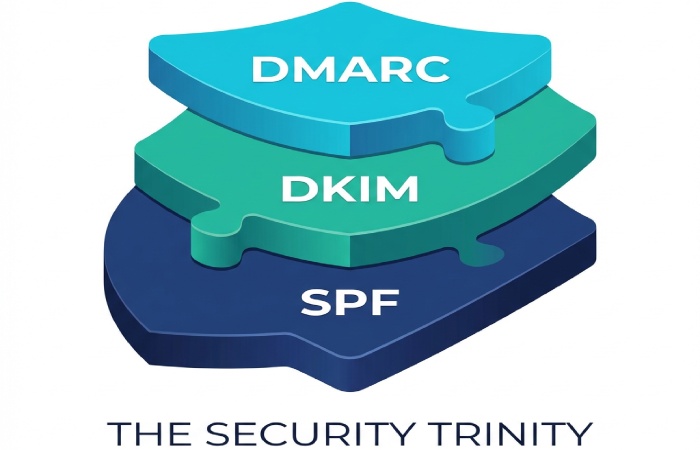
On modern internet mail, dkim works alongside SPF and DMARC to reduce phishing and business email compromise. SPF validates the sending IP against authorized senders, while DMARC adds policy and alignment to decide what to do when authentication fails. DKIM’s cryptographic digital signature is the linchpin for content integrity: it allows receivers to verify message signature attributes independent of the sending IP. When you add dkim record entries correctly to your DNS records, you raise trust with major providers and improve outbound mail placement.
Operationally, domainkeys identified mail helps gate forged domains and protects brands that use subdomain campaigns or bulk email services. The dkim signature travels with the message header, so even if mail routing passes through intermediaries, compliant receivers can still authenticate email with a public key fetched from a TXT record. For a broader strategy around email security , DKIM is a must-have control and a prerequisite for a strong DMARC record.
DKIM vs SPF and DMARC alignment
- SPF checks envelope-from against authorized hosts; changes in forwarding can break SPF. DKIM survives many forwarding scenarios because the message header includes the signature.
- DMARC requires alignment. With dkim, alignment is met when the d= signing domain matches or aligns with the visible From domain, commonly a custom domain like contoso.com.
- Combined, SPF, DKIM, and DMARC harden email protection, reduce spoofed senders, and give receivers confidence to enforce quarantine/reject.
How DKIM works under the hood: keys, selectors, signatures, and DNS TXT lookups
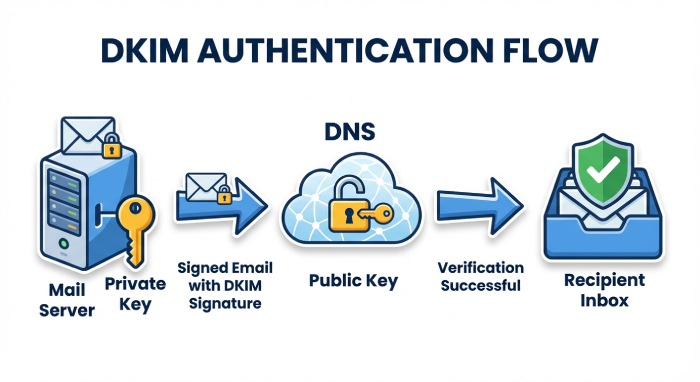
Under RFC 6376, dkim uses asymmetric cryptography: your mail server signs outbound mail with a private key while publishing the corresponding public key in DNS. The dkim signature in the message header includes which headers and body canonicalization were used, a selector, and the signing domain. Recipients perform a DNS TXT lookup at selector._domainkey.example.com to retrieve the public key and verify message signature details.
Key components:
- Selector: A label such as selector1.domainkey that identifies which key pair to use. Organizations often rotate between selector1.domainkey and selector2.domainkey for key rotation without downtime.
- Public key: Published in a TXT record under the domainkey subdomain so receivers can fetch it via DNS.
- Private key: Stored securely on the sending platform; used to create the digital signature attached to each message header.
- DNS records: Either a TXT record containing the key (most platforms) or cname records that point to a hosted key (common with Microsoft 365).
Because DKIM binds the signature to selected headers and the body, alterations en route are detected. Receivers validate by recomputing the hash using the public key and comparing to the dkim signature. This cryptographic approach allows independent verification even if mail routing changes after initial send.
What receivers verify in the message header
- The d= signing domain aligns with the From domain for DMARC.
- The s= selector maps to a TXT record or CNAME records under _domainkey.
- The bh= and b= values represent body and header signatures, ensuring message integrity.
- The a= algorithm (e.g., rsa-sha256) and c= canonicalization are standards-compliant per RFC 6376.
Canonicalization and hashing per RFC 6376
Receivers normalize whitespace and header order as defined by c= before hashing. The resulting hash is checked against the b= value using the public key from DNS. If the check passes, the receiver can authenticate email as DKIM=pass even if intermediate systems added benign footers.
Prerequisites and planning: domains, alignment goals, providers, and key length/algorithm choices
Before you add dkim record entries, clarify which domains and subdomains will send mail:
- Primary custom domain: e.g., contoso.com with marketing on cohowinery.com and receipts on cohovineyard.com.
- Subdomain strategy: Use dedicated subdomain sending (e.g., news.contoso.com) to isolate reputation and simplify DMARC alignment.
- Parked domains: Either don’t send or publish a no dkim keys policy by not signing and enforcing DMARC reject to prevent abuse.
Plan for:
- Alignment: Ensure the d= signing domain equals or aligns with the visible From to satisfy DMARC.
- Key length/algorithm: Use 2048-bit RSA where supported; select rsa-sha256 for strong security.
- Key rotation: Maintain at least two selectors (selector1.domainkey and selector2.domainkey) to rotate keys with zero downtime.
- Providers: Understand your DNS host and domain registrar interfaces to deploy TXT record values precisely; confirm any CNAME format requirements if your provider hosts keys.
Security goals:
- Combat phishing, forged domains, and spoofed senders by ensuring every outbound mail stream is DKIM-signed.
- Document mail flow, especially when multiple bulk email services or marketing platforms participate, so each system’s private key usage is clear.
- Establish governance so changes in dns configuration, such as new custom subdomains or add a domain events, always include dkim signing and DMARC updates.
Regulatory and platform notes:
- Microsoft 365 can sign with DKIM for your custom domain; you control this via the Defender portal under Email & collaboration > Policies & rules > Threat policies > Email authentication settings. There, you can enable dkim using a toggle enabled setting and confirm a status value before switching to toggle disabled if troubleshooting.
Generating DKIM keys and choosing selectors: provider tools vs command line, naming conventions, and multiple keys
You can create dkim keys using:
- Provider tools: Many ESPs generate the key pair and provide either a TXT record or CNAME records to publish. Some platforms show “no dkim keys saved” or “no dkim keys” until you provision them.
- Command line: Use OpenSSL to create dkim keys and output a public key for DNS. Keep the private key offline and restricted.
Selector strategy:
- Use meaningful selectors for clarity and key rotation, e.g., s=selector1 and s=selector2.
- For Microsoft 365, selectors are standardized: selector1.domainkey and selector2.domainkey. These often resolve via CNAME to the Microsoft Online Email Routing Address (MOERA) namespace under your initial domain prefix, such as contoso.onmicrosoft.com. The CNAME format typically uses a dynamic partition character (a hyphen) and a points to address resembling selector1-contoso-com._domainkey.contoso.onmicrosoft.com. This mapping keeps the private key managed by Microsoft while you publish the references.
Operational workflow with Microsoft 365:
- Publish the two CNAME hostnames at your dns host for each signing domain or subdomain. The hostname values are selector1.domainkey.yourdomain and selector2.domainkey.yourdomain, each with a point to address in the onmicrosoft.com MOERA space.
- In the Defender portal, navigate to Email authentication settings. If you see status value messages like no dkim keys saved, first publish the DNS entries. Then use the toggle enabled to activate dkim signing. You can verify dkim signing results in Threat policies or via message trace.
- Advanced admins can also use Exchange Online PowerShell to enable dkim and confirm configuration for each signing domain.
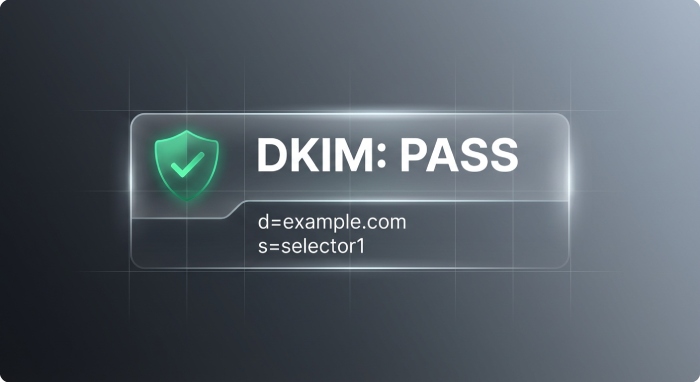
Validation:
- Send outbound mail from the domain and verify headers show a dkim=pass with the expected selector. This confirms receivers can query the public key via DNS and verify message signature checks.
Constructing the DKIM DNS record: required/optional tags, record name format, and long-record wrapping
Whether you add dkim record entries as a TXT record or rely on CNAME records, the naming is standardized:
- Record name format: selector.domainkey.yourdomain.tld (e.g., selector1.domainkey.contoso.com). The domainkey label is a dedicated subdomain for DKIM.
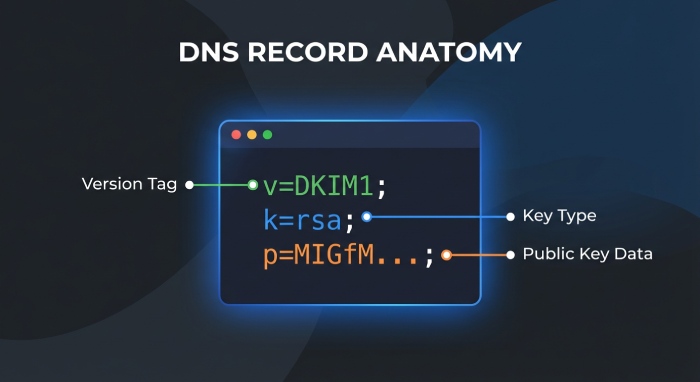
- TXT-based key publication: The TXT record includes tags such as v=DKIM1; k=rsa; p=PUBLICKEY. Required tags include v and p (the public key). Optional tags include t=y for testing, h= for signed headers, and n= for notes.
- CNAME-based publication: Some providers (notably Microsoft 365) require CNAMErecords instead of a direct TXT record. Your hostname remains selector1.domainkey.yourdomain, and the points to address references the provider’s hosted key under onmicrosoft.com.
Required elements:
- Public key: Ensure the value after p= contains the base64 data of the public key with no whitespace other than permitted wrapping.
- Selector: Match the s= value in the dkim signature to the DNS record name.
- DNS records: Publish with the correct TTL and ensure propagation before enabling signing.
Optional elements and practices:
- Long-record wrapping: Many DNS UIs allow splitting a long TXT record into quoted chunks; DNS concatenates them. Confirm your dns configuration guidelines for your domain registrar or dns host.
- Key rotation: Maintain selector1.domainkey and selector2.domainkey simultaneously. Rotate by publishing a new public key on the idle selector, switching signing, then rotating the other selector.
- Testing: Use t=y briefly during rollout. Remove once you authenticate email reliably and DMARC enforcement is active.
Implementation tips and pitfalls:
- Ensure every outbound mail system uses the correct private key. If multiple platforms send on behalf of your domain or subdomain, distribute keys or host separate selectors per service to preserve message integrity.
- If you migrate providers, update CNAME records first, wait for DNS to propagate, then switch signing. This avoids gaps where receivers cannot retrieve the right public key.
- Beware of mis-typed hostnames and selector mismatches. The message header d= and s= must correspond to the DNS record. Receivers can’t verify message signature data if the selector or domain is wrong.
- For parked domains that must never send, publish DMARC reject and do not add dkim record entries to discourage abuse.
End-to-end checklist to add dkim record correctly:
- Generate/create dkim keys using a secure process; protect the private key.
- Choose selector names and plan for key rotation.
- Decide between TXT record publication and CNAME format per provider guidance.
- Publish DNS records at the correct hostname under _domainkey for each custom domain and applicable subdomain.
- Enable dkim on the platform, verify dkim signing in logs, and test with live outbound mail.
- Monitor DMARC reports to verify message signature pass rates and overall mail flow health.

By following these practices, your domain implements domainkeys identified mail robustly, enabling reliable email authentication, protecting recipients from spoofed senders, and improving deliverability across diverse mail routing paths.
Adding DKIM records with common DNS providers
Publishing DomainKeys Identified Mail relies on precise DNS configuration. Whether you add DKIM record entries as TXT or CNAME, the process is similar: publish the selector host (for example, selector1._domainkey.contoso.com), point it to the correct value, and wait for propagation. The end goal is consistent email authentication for all outbound mail originating from your signing domain and any required subdomain.
Cloudflare
- Navigate to DNS and add a DNS record.
- For a TXT record, set Name to selector1.domainkey (or selector2.domainkey) on your custom domain or subdomain, and paste the value beginning with v=DKIM1; k=rsa; p= followed by your public key. Cloudflare handles long strings without manual splitting, reducing truncation risk.
- For hosted keys (common with ESPs), add CNAME records instead. The Name is selector1.domainkey and the target Points to address will be supplied by the provider (for example, selector1-contoso-com.domainkey.contoso.onmicrosoft.com). Ensure the record is DNS only; proxying is not applicable for DKIM.
- Verify the selector appears as a separate hostname under your zone. Keep TTL moderate to simplify key rotation.
Amazon Route 53
- In your hosted zone, Create record and choose either TXT or CNAME depending on provider guidance. For TXT, paste the full public key as a single string; Route 53 will automatically handle quotes.
- For CNAME records, carefully match the CNAME format and the exact hostname supplied by the ESP. Underscores in _domainkey are valid. If your tooling references a dynamic partition character policy, do not alter the underscore, DKIM requires it per RFC 6376.
- Use a TTL aligned to your rotation policy (for example, 1 hour to 4 hours). After you add DKIM record entries, confirm they resolve publicly using dig or Resolve-DnsName.
GoDaddy and registrar control panels
- In most domain registrar dashboards, add a TXT record and set Host to selector1.domainkey (not @). For subdomain sending, use selector1.domainkey.sub.example.com.
- Paste the full public key value into the TXT field. If the interface enforces line wraps, ensure the TXT record stores a continuous key without stray spaces or quotes.
- If your ESP requires hosted keys, create CNAME records with the provided Points to address and hostname exactly as given. Mis-typed selectors are a common cause of failed DKIM signature verification in the message header.
- For parked domains or custom subdomains that may send later, pre-stage selectors with a cautious TTL to support future mail routing without delays.
Across all providers, maintain an inventory of dns records for each selector, signing domain, and environment. The more methodical you are when you add DKIM record values, the more reliable your email authentication will be across outbound mail.
Special cases with ESPs: Google Workspace, Microsoft 365, SendGrid, Mailgun, TXT vs CNAME and hosted keys
Email service providers vary in how they deliver DomainKeys Identified Mail. Some hand you a public key for a TXT record; others host keys and ask you to publish CNAME records that delegate lookups.
- Google Workspace: In Admin Console, Create DKIM and select a selector (google typically), then publish the TXT record they provide. The TXT value contains the v=DKIM1; k=rsa; p=public key. After propagation, send a test to verify message signature in the Authentication-Results message header.
- Microsoft 365: Exchange Online often uses hosted keys via CNAME. You’ll publish selector1.domainkey and selector2.domainkey as CNAME records that point to your MOERA-based target under onmicrosoft.com. In the Defender portal, go to Email & collaboration > Policies & rules > Threat policies > Email authentication settings to enable DKIM; the UI may show no dkim keys or no dkim keys saved until the CNAME records resolve. Use Exchange Online PowerShell (Set-DkimSigningConfig -Identity contoso.com -Enabled $true) to enable DKIM and confirm the status value is enabled. This approach simplifies key rotation and improves email protection against phishing and business email compromise using spoofed senders.
- SendGrid and Mailgun: These bulk email services frequently require CNAME records. Publishing the exact CNAME format they provide allows them to host the public key and rotate it transparently. This keeps your private key within the provider’s HSMs while preserving message integrity and authenticate email alignment for DMARC.
When you add a domain to your tenant or ESP, confirm whether you’ll create DKIM keys locally or delegate via CNAME. For Microsoft 365, the Microsoft Online Email Routing Address (MOERA) influences the target hostname. The initial domain prefix you used (for example, contoso.onmicrosoft.com) appears in the CNAME target for selector1.domainkey and selector2.domainkey. Always match the selector and signing domain exactly to avoid misaligned dkim signature headers.
Verifying and testing: DNS checks, online validators, test messages, and reading Authentication-Results headers
After you add DKIM record entries, validate the dns records externally:
- Command line: dig TXT selector1.domainkey.contoso.com or nslookup -type=txt selector1.domainkey.cohovineyard.com to confirm the public key or CNAME target. For CNAME records, follow the chain to the TXT at the provider endpoint.
- Online validators: Use reputable DKIM checkers to verify d= (signing domain), s= (selector), and the presence of a valid public key. Many tools also test DMARC and SPF in the same pass, helping with comprehensive email authentication posture.
Send test messages from your mail server through normal mail flow to multiple receivers (for example, Outlook.com and Gmail). Open the full message header and look for Authentication-Results with dkim=pass, the correct selector, and your signing domain. The DKIM-Signature field should show a digital signature over selected headers and the body; examine b= and bh= tags for troubleshooting. In Microsoft 365, you can verify DKIM signing in the Defender portal under Threat policies > Email authentication settings and by using Exchange Online PowerShell to verify dkim signing configurations at scale.
If you use hosted keys and CNAME records, ensure the target resolves and propagates before you toggle enabled in the admin UI; some portals will auto-toggle disabled until the lookup succeeds. For broader guidance on email security , consult reputable providers when validating complex hybrid mail routing with multiple custom domain sources and subdomain senders.
FAQs
What is a DKIM selector and why does it matter?
A selector is the label (for example, selector1._domainkey) that tells receivers which DNS record holds your public key. It enables multiple keys per signing domain, supports key rotation, and prevents downtime during changes.
Should I publish DKIM as a TXT record or use CNAME records?
If your ESP hosts keys, they’ll ask for CNAME records that delegate to their infrastructure, simplifying rotation. If you manage keys yourself, publish a TXT record containing v=DKIM1; k=rsa; p=your public key under the selector hostname.
How do I verify that DKIM works?
Check DNS with dig or nslookup to confirm the selector resolves, then send a test email and read the Authentication-Results message header. Look for dkim=pass along with the expected selector (s=) and signing domain (d=).
How often should I rotate DKIM keys?
A common cadence is every 6-12 months, or immediately if a private key is suspected compromised. Alternate between selector1.domainkey and selector2.domainkey to ensure a safe rollover.
Why does DKIM fail after my gateway adds a footer?
Content modifications after signing can break the body hash. Adjust mail flow so the mail server signs last, or switch to relaxed canonicalization to reduce sensitivity to minor changes.
Key Takeaways
- Publish accurate dns records for each selector and domain, using TXT for self-hosted keys or CNAME for hosted keys.
- In Microsoft 365, enable dkim via Defender portal or Exchange Online PowerShell after CNAMEs resolve to onmicrosoft.com targets.
- Rotate keys safely using selector1.domainkey and selector2.domainkey, and reduce TTLs during changes.
- Validate with DNS lookups and by inspecting Authentication-Results for dkim=pass and correct alignment with DMARC.
- Troubleshoot failures by checking selector alignment, TXT record integrity, canonicalization settings, and downstream mail flow changes.
General Manager
General Manager at DuoCircle. Product strategy and commercial lead across the email security portfolio.
Secure your email infrastructure
Protect, authenticate, and deliver. Contact our team to find the right solution.