
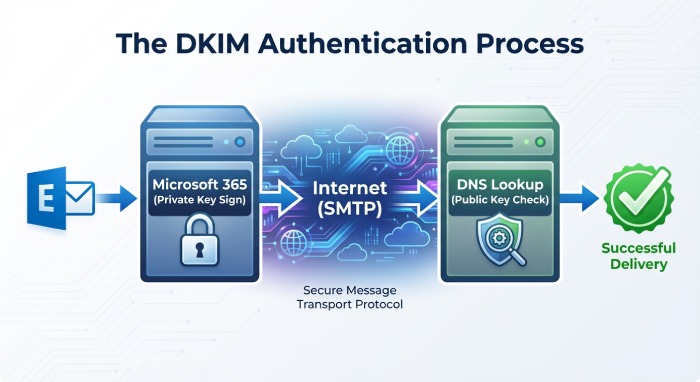
This step-by-step guide explains how to prepare your Microsoft 365 tenant and custom domain to publish a DKIM record, locate your Microsoft-managed DKIM key hostnames, and understand how DomainKeys Identified Mail works under the hood. You will learn how DKIM’s email authentication model uses a cryptographic signature based on a public key and private key pair to protect email messages as they traverse SMTP, and how Microsoft 365 implements selectors to support safe key rotation.
DKIM is defined by RFC 6376 as an authentication protocol and email standard. It allows the sending domain to attach a DKIM signature to a signed message. The receiving server then performs a DNS lookup to fetch the DKIM record and perform signature verification. Properly configuring your DNS record and selector values for Microsoft 365 strengthens email security, improves mail authentication, and helps receiving mailbox providers such as Gmail, Yahoo Mail, and Outlook trust email coming from your organization’s mail server.
Throughout this guide, you will see how the TXT record that contains the public key is referenced by a selector, how the signing key is handled by Microsoft 365, and how cryptography (typically RSA) underpins message authentication and forge prevention.
Why DKIM matters for Microsoft 365: deliverability, authentication, and alignment with SPF/DMARC
Deliverability and trust
- A validated DKIM record helps receiving server platforms verify email source and validate sender identity via digital signature checks on selected header fields. This boosts phishing protection and anti-spam efficacy while enabling inbox placement for legitimate outbound email.
- Microsoft 365 signs messages over SMTP, and when recipients connect using TLS, transport is protected in flight while DKIM protects message integrity end to end.
- When DKIM validation passes, receivers gain higher confidence to trust email from your domain because a cryptographic signature binds the content to your sending domain.
Alignment with SPF and DMARC
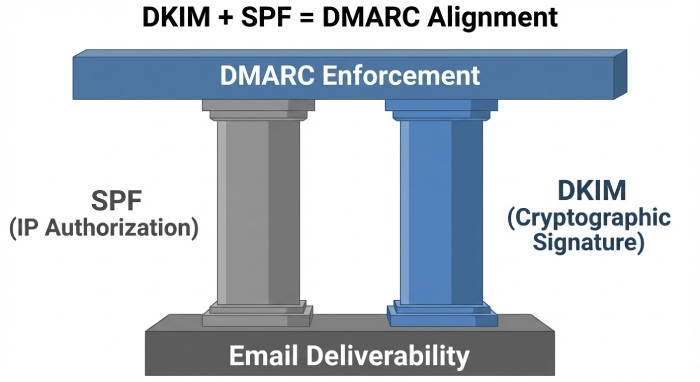
- DKIM works alongside SPF and DMARC. While SPF validates the mail server’s IP authorization and path, DKIM provides a cryptographic key-backed signature tied to a selector and signing domain (the d= tag).
- DMARC requires alignment between the From header domain and either the SPF domain or the DKIM d= domain. A stable DKIM key and correctly aligned DKIM record are essential for DMARC enforcement and your email domain policy.
Integrity, compliance, and visibility
- A DKIM signature confirms message integrity from the moment Microsoft 365 applies the signing key until the receiving server performs signature verification. This strengthens compliance postures and supports mail authentication auditing.
- DKIM also offers forge prevention by making it computationally infeasible to tamper with a signed message without breaking the cryptographic signature.
Prerequisites and planning: custom domain readiness, admin roles, DNS host access, and record TTL strategy
Custom domain readiness and verification
- Your custom domain must be added and verified in Microsoft 365. The domain owner should confirm that DNS is delegated correctly to the DNS host (for example, Cloudflare) and that existing TXT DNS record entries for SPF or other services are intact.
- Ensure that the sending domain you plan to sign (the From header domain) is active for outbound email.
Roles, permissions, and access
- You need sufficient admin roles in Microsoft 365 (Security Administrator or Exchange Administrator) to view and enable DKIM.
- You must have access to your DNS provider to create the required DNS record entries. For many tenants, these are CNAME records that reference Microsoft 365’s DKIM key infrastructure rather than a direct TXT record.
DNS host considerations and TTL strategy
- Plan a conservative TTL for new CNAME or TXT record changes (for example, 300–3600 seconds) to speed up propagation and DKIM validation testing. After verification, you can increase TTL.
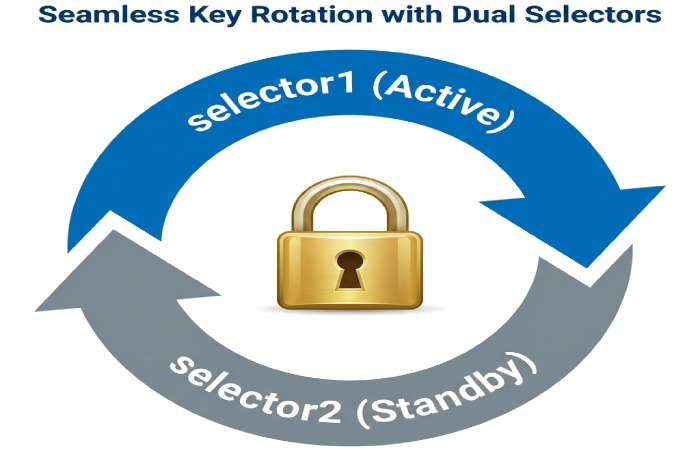
- Keep an inventory for key management and key rotation. Microsoft 365 provides two selectors (selector1 and selector2) to rotate the key pair with minimal disruption.
- If your DNS host has special handling for underscores or long TXT record strings, review their documentation to avoid formatting mistakes that could block DNS lookup resolution.
Microsoft 365 DKIM architecture: selectors (selector1/selector2), CNAME vs TXT, signing domain (d=), and key length
How selectors work and why they matter
- A selector is a label that, combined with _domainkey and your domain, forms the host used in the DNS lookup. The unique selector allows multiple DKIM keys to coexist for the same domain (for example, during rotation or across services like Amazon SES or Google Workspace).
- Microsoft 365 signs messages with one selector at a time. The DKIM signature in the header includes the s= selector and d= signing domain, allowing receivers to find the correct DNS record.
CNAME vs TXT in Microsoft 365
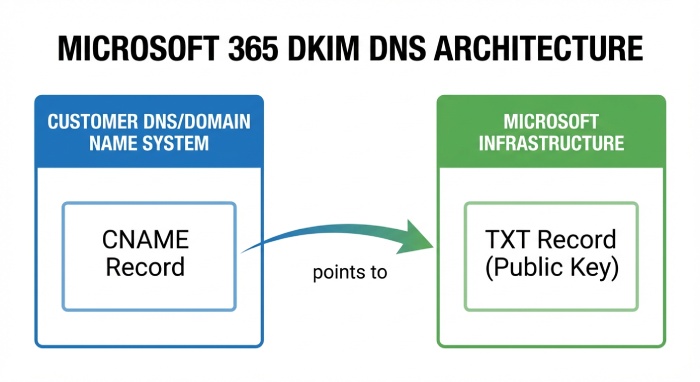
- In Microsoft 365, you normally publish a CNAME DNS record for each selector (selector1 and selector2). That CNAME points to a Microsoft-controlled hostname, which in turn hosts the TXT record containing the public key. This offers simplified key management because Microsoft manages the TXT record and rotates keys behind the scenes.
- Do not mix CNAME and TXT for the same host. If your DNS already has a TXT record where a CNAME is required, consolidate according to Microsoft guidance to avoid conflicts that break DKIM validation.
Example record names and tags
- Host (name): selector1.domainkey.yourdomain.com
- Type: CNAME DNS record
- Value (target): selector1-yourdomain-com.domainkey..onmicrosoft.com
- The actual TXT record at the target contains the p= public key and k=rsa, along with DKIM tags from RFC 6376.
Signing domain (d=), key length, and cryptography
- The d= tag identifies the signing domain. For alignment with DMARC, ensure the d= domain matches or aligns with the From header domain.
- Microsoft 365 supports 2048-bit RSA keys for stronger cryptography; use 2048-bit by default. The private key remains within Microsoft 365; the public key is exposed in DNS through the TXT record pointed to by your CNAME.
- Because the cryptographic key is an RSA key pair, the digital signature is verifiable but not forgeable without the private key, enabling robust authenticated emails guarantees and message authentication.
Step 1: Find your DKIM selectors and hostnames in the Microsoft 365 Defender/Exchange admin centers
Using Microsoft 365 Defender
- Go to the Microsoft 365 Defender portal.
- Navigate to Email & collaboration > Policies & rules > Threat policies > DKIM.
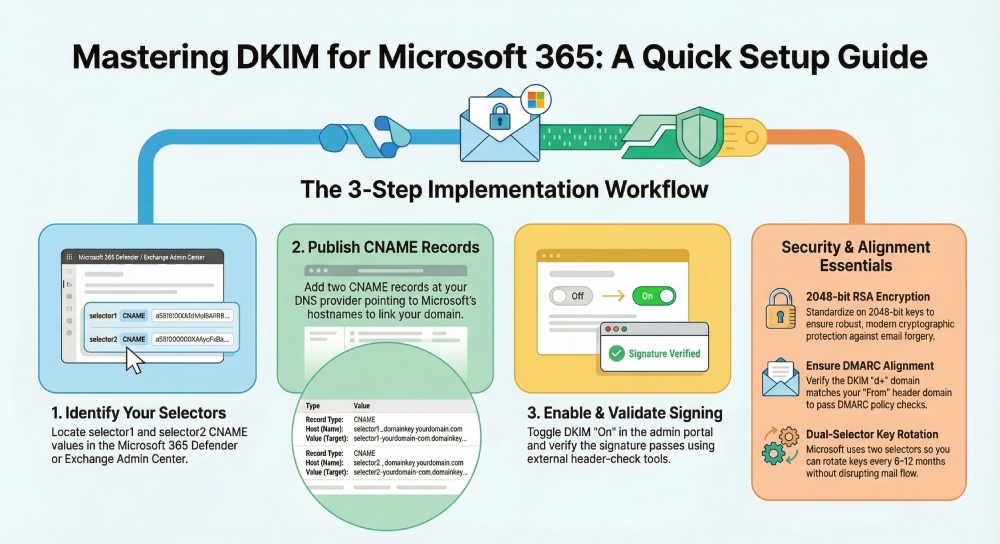
- Select your domain. You will see selector1 and selector2 entries with the DNS record details you must create. Copy each host (name) and the corresponding CNAME target. This is your DKIM key publishing path.
Using Exchange admin center (EAC)
- Open the Exchange admin center.
- Go to Mail flow > DKIM.
- Select the sending domain and view the selector details. The interface exposes the same CNAME records required for the DKIM record publication. If the toggle to enable DKIM is present, it will remain inactive until DNS propagates and the receiving server can complete DKIM validation.
Capture the exact DNS record details
- You need one DNS record per selector: selector1.domainkey.yourdomain.com and selector2.domainkey.yourdomain.com. Each will be a CNAME pointing to a Microsoft 365 hostname that ultimately hosts the TXT record with your public key.
- After creating the DNS record entries at your provider, allow TTL to elapse, then enable DKIM in the portal. Use external tools to decode DKIM results on a test message to confirm signature verification.
Exact labels you’ll need (example)
- Name: selector1.domainkey.yourdomain.com
Type: CNAME
Target: selector1-yourdomain-com.domainkey..onmicrosoft.com
- Name: selector2.domainkey.yourdomain.com
Type: CNAME
Target: selector2-yourdomain-com.domainkey..onmicrosoft.com
These records enable Microsoft 365 to publish the TXT record containing the p= public key for each selector. Once published, outbound email will carry a DKIM signature referencing the active selector so receivers can perform a DNS lookup and confirm message integrity.
Notes for common DNS providers and operational tips
- Cloudflare: When adding a CNAME for selector1._domainkey, ensure the proxy is set to DNS only (no orange cloud) so DKIM lookups resolve correctly. Verify the final TXT DNS record resolves by querying the CNAME target.
- Other hosts: Some providers wrap long TXT record strings. With Microsoft 365’s CNAME model, you generally avoid manual TXT record entry, but if you ever publish a direct TXT record for a DKIM key with another email provider (e.g., Amazon SES or Google Workspace), confirm quoting and chunking rules.
- Testing: Send test email messages to external inboxes at Gmail, Yahoo Mail, and Outlook. Review the full header to confirm the DKIM signature shows s=selector1 (or selector2) and that signature verification passes. Many receivers surface “DKIM=pass” in message headers.
- Operations: Maintain a calendar for key rotation. Microsoft 365 simplifies rotation by using two selectors; switch to the alternate unique selector when rotating. Keep a runbook for key management, mail authentication checks, and troubleshooting DKIM validation failures.
- Standards and security: DKIM is defined by RFC 6376 and commonly uses RSA cryptography. Together with SPF and DMARC, it provides layered phishing protection and forge prevention across inbound email and outbound email streams. While TLS secures SMTP transport, DKIM’s cryptographic signature ensures content integrity from signer to verifier.
- For ongoing insights on email security, threat trends, and authentication best practices, consult Duocircle.
Step 2: Publish the two DKIM CNAME records at your DNS provider
Enabling DomainKeys Identified Mail in Microsoft 365 starts with publishing two DKIM record entries as CNAMEs in your DNS. This links your domain to Microsoft’s hosted public key, allowing a receiving mail server to find the DKIM key via DNS and verify the DKIM signature. While many platforms host the public key as a TXT record, Microsoft 365 uses CNAME DNS records that point to Microsoft-managed TXT records, which simplifies key management and strengthens email security through consistent cryptography practices.
Locate your Microsoft 365 DKIM selectors
- In the Microsoft 365 Defender portal, find the DKIM blade for your domain. Microsoft provides two selectors (typically selector1 and selector2) for redundancy and key rotation.
- Each selector corresponds to a DKIM record under the _domainkey subdomain. The selector determines the exact DNS record name and is critical for DKIM validation, so use the provided Selector values verbatim.
Add CNAME DNS records in common providers
- Cloudflare: Create two CNAME DNS records named selector1.domainkey.yourdomain.com and selector2.domainkey.yourdomain.com. Set Proxy status to DNS only (do not proxy). Cloudflare supports underscores and CNAMEs at subdomains; ensure no conflicting TXT DNS record exists at the same host.
- GoDaddy: Add CNAME records for each selector under the domainkey subdomain. GoDaddy may auto-append your domain; enter the host as selector1.domainkey and selector2._domainkey without duplicating the domain.
- Amazon Route 53: Add CNAME records with a low TTL (e.g., 300 seconds) for fast propagation. Route 53 accepts underscores and long targets. Ensure there’s no existing TXT record at the selector host.
Avoid mixing record types with the same name; a CNAME and TXT record cannot coexist. Each DKIM record must point cleanly to Microsoft’s target. Consistent, accurate DNS records underpin reliable email authentication and forge prevention.
Example CNAME targets in Microsoft 365
- selector1.domainkey.yourdomain.com CNAME selector1-yourdomain-com.domainkey..onmicrosoft.com
- selector2.domainkey.yourdomain.com CNAME selector2-yourdomain-com.domainkey..onmicrosoft.com
Note: Use the exact targets Microsoft shows for your tenant; hyphens replace dots in your sending domain. Publishing the correct DNS record ensures the receiving server can perform a DNS lookup to retrieve the public key for signature verification.
Verify DNS propagation with DNS lookup tools
Use dig, nslookup, or web tools to confirm each DKIM record resolves:
- dig CNAME selector1._domainkey.yourdomain.com
- MXToolbox DKIM Lookup or DNS tools to check each selector’s chain to the public key
- Confirm no typos in the selector and no stray TXT record remains. Proper DNS results mean your domain is ready for the next authentication step.
Step 3: Enable DKIM signing for the domain and confirm propagation
Turn on DKIM in the Microsoft 365 admin experience
- Go to Microsoft 365 Defender (security.microsoft.com) > Email & collaboration > Policies & rules > Threat policies > DKIM, or in the Exchange admin center > Protection > DKIM.
- Select the domain and enable DKIM signing. Microsoft will use the active signing key (RSA) mapped by the selector to generate a digital signature over chosen header fields and the message body.
- Ensure TLS is enabled for SMTP transport where possible; while TLS protects data in transit, DKIM’s message authentication and integrity check persist end-to-end and are validated by the receiving server.
Confirm the active selector and 2048-bit signing key
- After enabling, send email messages to external mailboxes (e.g., Gmail, Yahoo Mail, Outlook.com). Check that the DKIM signature shows d=yourdomain.com and s=selector1 (or selector2) in the header.
- Microsoft 365 supports 2048-bit DKIM key lengths. Using a 2048-bit cryptographic key pair increases email security. Verify your tenant reports 2048-bit in the admin UI. Robust cryptography hardens your mail authentication framework against malicious emails and email spoofing.
Step 4: Test and validate DKIM: message headers, remote checks, and alignment with DMARC
Inspect DKIM-Signature and Authentication-Results header fields
In the received message, open the full header. Look for:
- DKIM-Signature: v=1; a=rsa-sha256; d=yourdomain.com; s=selector1; h=…; bh=…; b=…
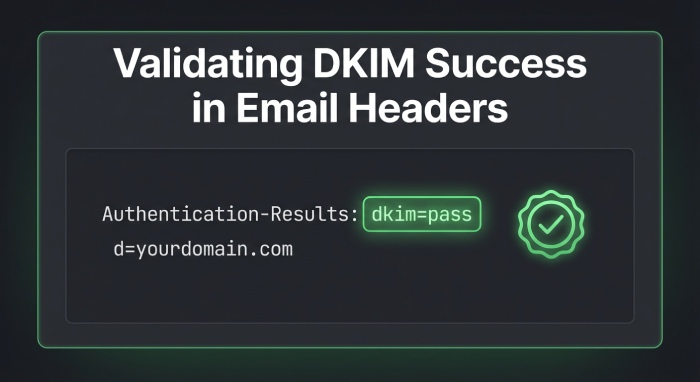
- Authentication-Results: dkim=pass header.i=@yourdomain.com
- The header field list (h=) shows which headers are protected. A pass indicates the receiving server could decode DKIM and perform signature verification using the public key found via DNS lookup. This is core DKIM validation per RFC 6376, the email standard defining the authentication protocol.
Remote DKIM validation with MXToolbox and mailbox tests
- Use MXToolbox’s DKIM Lookup to confirm each selector resolves to a valid public key. Tools can decode DKIM parameters and highlight formatting problems with the TXT record at the target.
- Send test messages to Gmail and view “Show original” to see DKIM, SPF, and DMARC results. Yahoo Mail provides similar visibility. This cross-mailbox testing ensures broad anti-spam and phishing protection efficacy across major email providers.
Check DMARC/SPF alignment and message authentication
- DMARC alignment requires the d= value in the DKIM signature to align with the From domain (organizational alignment, relaxed or strict). Confirm your domain alignment meets your email domain policy.
- SPF complements DKIM but is path-based. Maintain accurate SPF alongside DKIM to authenticate emails sent via Microsoft 365 connectors and any third-party email provider.
- When DKIM passes and aligns, DMARC can instruct receiving systems to trust email source and apply p=quarantine or p=reject for stronger mail delivery enforcement and spam reduction.
Ongoing management: key rotation cadence, multiple domains, hybrid and third‑party senders
Key rotation cadence and key management
- Rotate your DKIM key pair at least every 6–12 months. Microsoft’s dual selectors (selector1 and selector2) enable safe key rotation: switch signing to the alternate selector, update the CNAME target, then retire the old key after TTL expiration.
- Document rotation dates, selectors in use, and change approvals. Proactive key rotation reduces risk from compromised private keys and aligns with cryptography best practices.
Multiple domains and subdomains
- Each domain and subdomain that sends outbound email requires its own DKIM record set and unique selector values. Avoid reusing a unique selector across unrelated domains.
- Verify that every sending domain used by business units or marketing has DKIM enabled and aligns with DMARC. Consistency ensures message authentication regardless of which subdomain appears in the From header.
Hybrid Exchange and external email providers
- In hybrid scenarios or with third-party platforms (e.g., Amazon SES, marketing tools, Google Workspace alongside Microsoft 365), enable DKIM at each sender. Most services publish a TXT DNS record for the public key; follow their instructions and ensure alignment with DMARC.
- When integrating external services, validate sender alignment and configure custom MAIL FROM where supported. Confirm that each mail server signs outbound email, that the signing key corresponds to the correct DNS record, and that SPF records include the relevant hosts.
FAQs
Do I need TXT records for Microsoft 365 DKIM?
Microsoft 365 uses CNAMEs for each selector that point to a Microsoft-hosted TXT record containing the public key. You should not create TXT records at the _domainkey hosts in your zone when using Microsoft 365; use the exact CNAMEs provided.
How can I tell which selector is currently active?
Check the DKIM-Signature header in a signed message; the s= tag shows the active selector. In the Microsoft 365 portal, the DKIM page for your domain also indicates which selector and signing key are in use.
What’s the recommended DKIM key length?
Use 2048-bit RSA keys for stronger cryptography and better phishing protection. Microsoft 365 supports 2048-bit by default, aligning with RFC 6376 recommendations and modern email security expectations.
How does DKIM interact with DMARC and SPF?
DKIM and SPF feed into DMARC’s policy evaluation, which checks alignment with the From domain. If either DKIM or SPF passes and aligns, DMARC can pass, enabling you to enforce quarantine or reject for stronger forge prevention.
Why do some messages show dkim=fail even after I enabled DKIM?
Typical causes include DNS propagation delay, a selector mismatch, or a mispublished DNS record. Verify the CNAME chain, confirm the correct selector, and retest after TTLs expire.
Key Takeaways
- Publish two Microsoft 365 DKIM CNAME records per domain, verify DNS propagation, then enable signing.
- Validate DKIM using headers, MXToolbox, and ensure DMARC alignment for policy enforcement.
- Rotate DKIM keys regularly using dual selectors, and manage unique selectors per domain/subdomain.
- For hybrid and third-party senders, enable DKIM everywhere and coordinate DNS and DMARC alignment.
- Monitor Authentication-Results and DMARC reports; use strict change control to prevent outages.