
How to Add SPF and DKIM records in GoDaddy?
SPF and DKIM collectively prevent you from email spoofing and phishing while also ensuring nobody tampers with messages in transit. To get started with them, domain administrators have to create their respective records and add them to their domain’s DNS.
In this blog, we are particularly learning how to add SPF and DKIM records in GoDaddy.
What is SPF?
SPF verifies whether the email sender is actually who they are claiming to be. To do this, domain administrators have to list down all the IP addresses they trust to send emails on their behalf. An SPF record also includes other instructions for recipients’ servers, which is done using a combination of syntax (categorized as mechanisms, modifiers, and qualifiers).
An SPF softfail is indicated by ‘~all,’ and it instructs recipients’ servers to mark potentially fraudulent and suspicious emails as spam. On the other hand, a hardfail is indicated by ‘-all,’ and it commands recipients’ servers to bounce back illegitimate emails sent from your domain.
Adding an SPF Record in GoDaddy
Here’s how you can go about-
Log in to Your GoDaddy Account
Go to the GoDaddy website and put in your credentials to log in.
Go to Domain Management
After you log in, look for the ‘My Products’ section, and you’ll find an option to add an SPF record.
Check DNS Management
Go to the DNS management console and look for the domain for which you have to add an SPF record. There will be three spots or the ‘DNS” option allowing you to access the DNS management settings corresponding to your chosen domain.
Add SPF Record
Now, look for an option to add a new record in the DNS management section.
Enter SPF Record Details
Then, enter/select the following details-
- Value field- TXT.
- Host as @.
- TXT value (copy and paste the SPF record you have generated)l.
Valid SPF record example:
v=spf1 include:yourdomain.com -all
Please ensure no white spaces or double quotes are in the enclosed SPF record.
Save Changes
Click on the ‘Save’ button when the steps are completed.
Check SPF Record
DNS takes some time to propagate changes across the internet. So, it’s suggested that you wait for around 24 hours and use an SPF record checker tool to ensure an SPF record has been added in GoDaddy for your domain.
What is DKIM?
DKIM prevents email spoofing and tampering by using cryptographic signatures, which is an encrypted header added to an email. It supports several digital algorithms, including rsa-sha1 and rsa-sha256. The system picks rsa-sha256 as the default algorithm when nothing is specified.
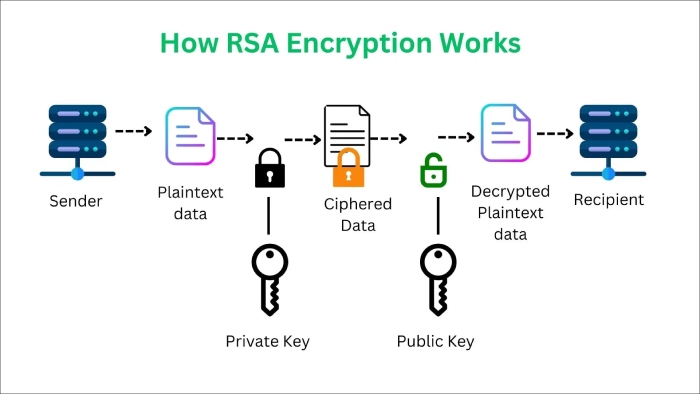
When an email is sent, the sender’s email server signs the email header with a private key. Upon reception, the receiver’s server accesses the public key available on the DNS to verify authenticity by comparing public and private keys.
Adding a DKIM Record in GoDaddy
After creating a DKIM record manually or using an online record generator, perform the following steps to add it to GoDaddy-
Produce DKIM Keys
Create a pair of cryptographically secured public and private keys and ensure that the DKIM keys are at least 1024 bits long to minimize the risk of exploitation.
Log in to your GoDaddy Account
Use your credentials to log in to your GoDaddy account, allowing you to navigate through consoles and adjust settings to suit your preferences.
Access Domain Management
Navigate to the “My Products” section on the dashboard.
DNS Management Console
Locate the domain for which you need to add the DKIM record. Click on the three dots or select the ‘DNS’ option to access DNS management settings.
Add DKIM Record
Locate an option within the DNS management section to add a new record.
Add DKIM Record Details
Add DKIM record details in the ‘Records’ section, and input the details as follows:
- Type filed as TXT.
- Provide the public key in the ‘Host’ section.
- Add the DKIM key value in the ‘TXT Value’ section.
- The TTL (Time To Live) value is typically set to 3600 by default. This represents the duration for which the server should cache the information.
Save Changes
Click the ‘Save’ button once you have entered the necessary information.
Verify Status
Verify the status after saving the changes. It may take some time for them to propagate. Use an online DKIM checker to verify that your DKIM record has been added correctly.

Implementing SPF and DKIM records on GoDaddy is essential for enhancing email security and increasing email deliverability. By taking these basic but effective steps, you can enhance the integrity of your email communications, ensuring that messages sent from your domain are reliable and less vulnerable to fraudulent behavior.