Learning to Set Up SPF, DKIM, and DMARC For Klaviyo

Quick Answer
Klaviyo (over 6.9 billion consumer profiles as of June 2023) requires SPF, DKIM, and DMARC for email-marketing deliverability and to comply with the Google and Yahoo bulk-sender rules. SPF and DKIM setup: in Klaviyo go to Settings > Domains > Add Domain, accept the suggested sending subdomain, and copy the generated CNAME and TXT records into the domain's DNS zone (one CNAME, two DKIM CNAMEs, one TXT). Click Verify Records, then Activate; status flips to Active. DMARC setup: Settings > Domains and Hosting > Get Started, fill in Root Domain and Sending Domain, copy the three CNAMEs and one TXT into DNS, click Continue to Verify Domain, and wait 24-48 hours for propagation. Start at p=none with rua reporting, monitor 2-4 weeks, then advance to p=quarantine and p=reject.
Learning to Set Up SPF, DKIM, and DMARC For Klaviyo

As of June 30, 2023, Klaviyo has assembled over 6.9 billion consumer profiles across its customer base, placing it as one of the most used platforms for marketing automation for email marketing, SMS, and CDP. Taking these growth factors into consideration, we are sharing the email authentication guide for Klaviyo users so that they stay abreast of phishing and spoofing attackers.
Why Email Authentication Matters for Klaviyo Users?
Email authentication is the process of confirming if email senders are actually who they are claiming to be and are not impersonating brands, employees, and individuals. It also improves your domain’s reputation and increases the chances of emails landing in inboxes instead of spam folders.
Broadly speaking, email security, an integral part of phishing prevention, aids in warding off phishing attempts as well as mitigating any legal complications that might arise from such events. Emphasizing phishing protection in our digital safety measures is key to ensuring this level of security. Moreover, it is also becoming one of the compliances for many platforms and government regulations.
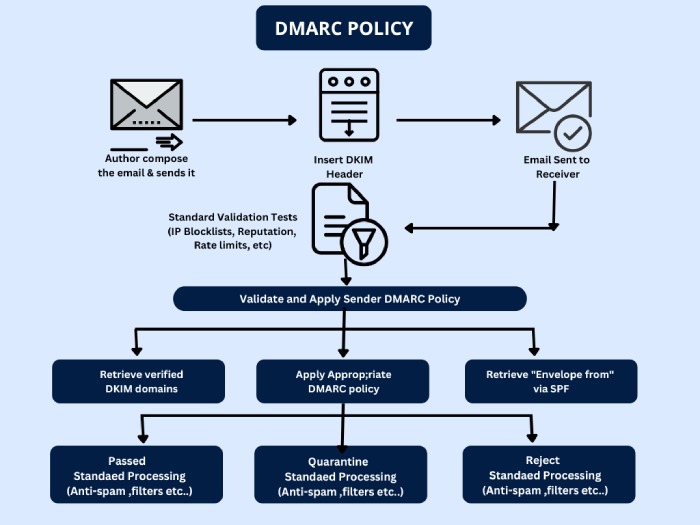
We will be discussing setting up the three primary email authentication protocols, Sender Policy Framework (SPF), DomainKeys Identified Mail (DKIM), and Domain-based Message Authentication Reporting and Conformance (DMARC).
How to Get Started with Email Authentication for Klaviyo?
Post the new requirements of Google and Yahoo, more emails are bouncing back, especially for senders lacking SPF, DKIM, and DMARC or due to misconfigured DNS records. So, here are step-by-step instructions for getting started with email authentication for Klaviyo.
Setting Up SPF and DKIM
- Go to Klaviyo, navigate your account name on the below-left corner of the screen, and click on ‘Settings.’
- Then click on ‘Domains.’
- Select the ‘Add Domain’ tab to get started with the configuration process.
- The platform will fill your domain and create a subdomain for you on its own. You can change the sending subdomain.
- Next, Klaviyo produces records that you can add to your DNS so that recipients’s servers can access them for verification and authentication.
- Copy the CNAME record, go to your DNS zone to create a new CNAME record, and paste the copied record there.
- Then copy the first DKIM record, go to your DNS zone to create a new CNAME record, and paste the copied record there.
- Now, copy the second DKIM record, go to your DNS zone to create a new CNAME record, and paste the copied record there.
- Lastly, copy the final TXT record, go to your DNS zone to create a new TXT record, and paste the copied record there.
- Once all the records are added to your DNS zone, navigate back to Klaviyo and click on the “Verify Records” button.
- Once done, you will notice that all the warnings are changed to green.
- Click on ‘Activate‘.
- You are done. You will see your domain as ‘Active.’
Setting Up DMARC
Go to the ‘Domains and Hosting’ tab in Klaviyo:
- Navigate to the top right corner of your account and choose your organization name from the drop-down list.
- On the ‘Account’ page, click the ‘Settings’ drop-down and opt for ‘Domains and Hosting‘ from the main tab.
- Click on ‘Get Started’ to proceed.
Produce DNS records:
- Complete the ‘Set Dedicated Domain’ form by entering values for ‘Root Domain‘ and ‘Sending Domain,’ then click ‘Continue.’
- Klaviyo will generate DNS records that need to be published in your DNS to enable email authentication for your domain.
Update your DNS records:
- Log in to your ‘DNS management console’ and locate the ‘DNS records‘ section.
- Copy the three CNAME records and add them to your DNS.
- Similarly, copy the last TXT record and include it in your DNS configuration.
Click ‘Continue to Verify Domain’.
- Note: After completion, wait for 24-48 hours for your DNS changes to propagate, then revisit your Klaviyo account.
Initiate the domain application.
- If your domain is successfully verified, the final step will appear.
- You will be presented with two options: ‘Apply Domain’ and ‘Cancel Dedicated Domain Setup.’ Choose ‘Apply Domain‘.

How Can We Help You?
Klaviyo’s user base is vast, including businesses that use it alongside a customer data platform, and we understand how confusing the whole email authentication setup can get. We at DuoCircle offer assistance with everything related to DMARC, right from the initial guidance to implementation to reporting.
All you have to do is get in touch with our support executives and book a demo. We are GDPR compliant and have a 99.99% uptime. So, let’s catch up to discuss your work and our journey towards a safer email infrastructure across the globe.
Topics
General Manager
General Manager at DuoCircle. Product strategy and commercial lead across the email security portfolio.
Secure your email infrastructure
Protect, authenticate, and deliver. Contact our team to find the right solution.