DMARC For Shopify Users
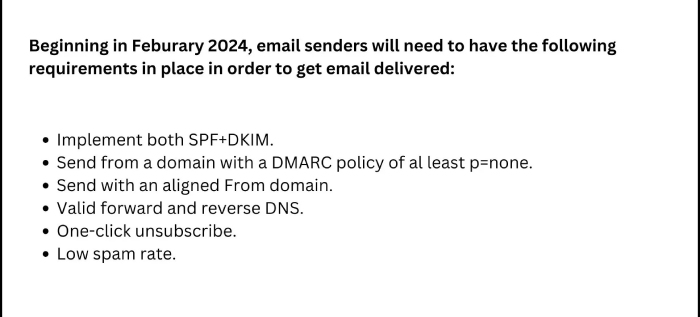
DMARC isn’t a new regime; however, regulations and email service providers have now made it mandatory. This exercise is meant to reduce phishing and spoofing by filtering genuine and fraudulent emails. DMARC works in accordance with SPF and DKIM to instruct recipients’ servers to either reject or mark illegitimate emails as spam, reducing the likelihood of victims engaging with such emails and getting manipulated.
By publishing a well-updated DMARC record in your domain’s DNS, you combat business email compromises, ransomware, spamming, etc., attempted in your name. It allows companies to gain insights into their email ecosystem through reporting functionalities so that they can monitor and analyze email traffic, identify potential threats, and take proactive measures to improve overall email deliverability and security. All this eventually builds trust with customers and partners as they become sure that you take care of their privacy and data.
Why Email Authentication Matters for Shopify Users?
Shopify users rely heavily on email communication to engage with customers and prospects for sending order confirmations, shipping updates, marketing promotions, etc. Authentication confirms their emails are genuinely sent from their Shopify store, instilling trust and credibility with recipients.
This practice also contributes to email deliverability. Internet service providers and email service providers increasingly use authentication mechanisms to detect and block fraudulent emails. By authenticating their emails, Shopify users can improve their sender reputation and ensure their messages reach customers’ inboxes rather than being flagged as spam or phishing attempts.
Configuring DMARC for Shopify
To begin, navigate your Shopify admin dashboard or your DNS hosting provider’s management console to allow the requisite changes to propagate by adding TXT files. Then, perform these steps-
- Create a free trial account if you don’t have one.
- Go to your Shopify account and head to Settings > Notifications > Sender Email.
- Click on ‘Authenticate Your Domain’ to receive all the CNAME records you need to add to your domain’s DNS.
- Once everything is set, you will see an “Authenticated” notification on your Shopify portal. This process can take up to 24 hours.
- Create a DMARC record using an online DMARC record generator. Make sure you already have SPF and DKIM records in place.
- After creating a DMARC record, your DMARC report will start to process. You can use our platform to convert complicated XML reports into an easy-to-read format.
Prepare For Long Term Compliance
Deciding when to switch from ‘none’ to ‘quarantine’ or ‘reject’ policy in DMARC depends on various factors, including your organization’s email security posture, level of email authentication maturity, and tolerance for potential email deliverability issues.
Evaluate DMARC aggregate reports for some time to gain insights into the sources and volume of unauthorized email activities targeting your domain. We emphasize starting with the ‘quarantine’ policy before transitioning to the ‘reject’ policy. This gradual rollout allows you to assess the impact on email deliverability and address any issues before fully enforcing a stricter policy.
It’s important that you establish realistic expectations from the process and continue monitoring and adjusting aggregate reports, as the online ecosystem is quite dynamic. If needed, communicate the planned policy changes with relevant stakeholders, including IT, email administrators, and marketing teams.
Ensure that all parties understand the rationale behind the policy changes and are prepared to address any potential implications on email deliverability.
If you need more help or clarification, just knock on our door; we are always here to help you with DMARC!
For growing enterprises, partnering with a trusted Shopify plus development agency ensures your store is scalable, secure, and built to deliver long-term success.